Chart your data journey! Transform data into insights with Power BI core visualizations.
Welcome back to our exploration of the core visuals in Power BI. In Explore Power BI Core Visualizations Part 1 we explored bar and column charts and how they can be used and customized within our report to provide insights.
Now, we will explore another set of visuals in Power BI: Line and Area charts. These visuals are essential tools for displaying trends and patterns over time, making them ideal for analyzing time series data, monitoring performance, or illustrating cumulative values.
Let’s dive in and explore how to create, customize, and enhance our Line and Area Charts in Power BI to elevate our reports.
Types of Line Charts
Line charts are a fundamental tool in data visualization, especially when it comes to displaying trends and changes over time. A line chart provides our viewers a continuous flow of connected data points that are easy to follow and makes them ideal for visualizing trends.
In Power BI, we have several varieties of line charts, each serving a unique purpose and offering different way to analyze and display different data. Let’s explore these main types.
Line Chart
A standard line chart is the simplest form, and typically used to display time on our x-axis and a metric being measured on the y-axis. This type of chart is excellent for tracking sales or other metrics over months, quarters, or years.

Line and Stacked Column Chart
Line and stacked column charts combines a line chart with a stacked column chart, providing a dual perspective on our data. The line represents one metric, while the stacked column represents another. This type of chart can be useful for comparing the overall distribution of different categories along with the trend of a key metric.
For example, we can use a line and stacked column chart to display our year-to-date cumulative sales as a continuous series while showing the monthly contribution of each sales region.

Line and Clustered Column Chart
The line and clustered column chart is another hybrid visual that combines a line and clustered column charts. In this chart type, columns represent individual categories clustered together, while the line element shows the trend of a specific metric. For example, we can show a comparison of the previous year and current year monthly total sales as our clustered columns and the average sales for each year over time on our line axis.

Each of these chart types provides a unique way to visualize data, offering flexibility and depth to our analysis. Understanding when and how to use these different line charts can greatly enhance our ability to communicate data insights effectively.
Customizing Line Charts
Customizing line charts in Power BI allows us to create visually appealing and informative visuals that effectively communicate our data trends to our viewers. There are various ways and opportunities for out of the box thinking when it comes to our customizations. Here we will focus on some of the main customization options available across all of the line chart types.
Line Color and Styles
To make our lines more visually distinct we can leverage the properties found under the Line property group. These options let us define the color, style, and thickness of all the lines on our chart or for specific series.

Let’s explore these options to improve the Total & Average Sales Line and Clustered Column visual shown above.
We start by adjust our colors, we will keep a blue color theme for 2024 data and use a gray color theme for 2023 data. Under our Lines property setting we select our Average Sale 2024 in the Series drop down and select 60% lighter color of our dark blue in our Power BI theme, keeping it consistent and corresponding to the 2024 column.
Next, we select the Average Sale 2023 series in the Series dropdown and set the color to a gray. We select a color that is light enough to contrast with the dark blue bars, yet dark enough to contrast the light-colored background of the visual.
This slight change already improves our visual’s clarity, but we can go one step further. In addition to using different colors to differentiate our lines we can use different styles to further differentiate our series. Here, with the Average Sale 2023 series selected, under the Line options we set the Line style to Dashed and reduce the width to 2px.

Data Markers and Labels
In addition to setting different colors and styles for our lines, we can also set the data marker style or not show them at all.

Data markers make it easier to identify specific values and can help compare different values. For example, in the above visual we only show data labels for the Average Sale 2024 series. However, since we show the data markers for both series, we can present our user the current year’s average and its value, and then it can easily be compared to the previous year’s data marker.
Let’s further clarify our different series by setting the data marker for our Average Sale 2023 to a diamond shape and reduce its size to 4px. We select the series we want to modify from the drop down, and then select diamond in the shape dropdown and then reduce the size.

Adding data labels to our visuals provides our viewer additional context and precise information by displaying the value of each data point on the chart. We find the options to customize our data labels under the Data labels property group. Here, we find options to set the position of our data labels, display a title, customize the value displayed and how it is formatted, add additional detail to display another value, set the background of the label, and define whether the label should appear on a single line or multiple lines.

To help not clutter our Total & Average Sales visual we turn off the labels for the 2023 column and series. To do this we select each series in the Series dropdown and toggle off the Show for this series option.
Then we modify our data labels for our 2024 columns and Average Sale 2024 series. We start with our 2024 column data label and select it in the Series dropdown. Then we set the background of the data label to the same color as the column, set the value color to white, and under the options settings we select Outside end in the Position (column) dropdown.
Then we select our Average Sale 2024 in the Series dropdown, set the background to the same color as the line, the value color to a dark blue, and select Above in the Position (line) dropdown.
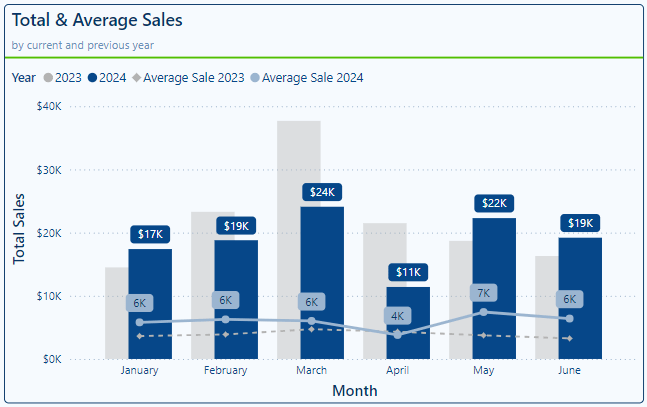
By customizing our line color, style, data markers and data labels our visual now more clearly differentiates between our 2024 and 2023 data through the use of different colors and styles. Clearly labeling our 2024 data points provide precise information for the current year data, while also being able to relatively compare this value to the previous year data.
Other Customizations
There are many other customization options available. There are other line chart specific options to explore including series labels and shading the area under the line series. Then there are also customization options that are common across many different visual types including formatting the x- and y-axis, the legend, gridline, tooltips, etc. For examples and an exploration of these common options visit Part 1 of this series.

Explore Power BI Core Visualizations: Part 1 – Bar and Column Charts
Chart your data journey! Transform data into insights with Power BI core visualizations.
By customizing our line charts, we are able to create compelling visuals that highlight key trends and insights in our data. By leveraging these different customization options, we can enhance the clarity and impact of our visuals.
Types of Area Charts
Area charts are a variation of line charts that fills the area beneath the line with color, emphasizing the magnitude of the values. They can be particularly useful for visualizing cumulative data, where the area fill highlights the overall value in addition to the trend.
Area Chart
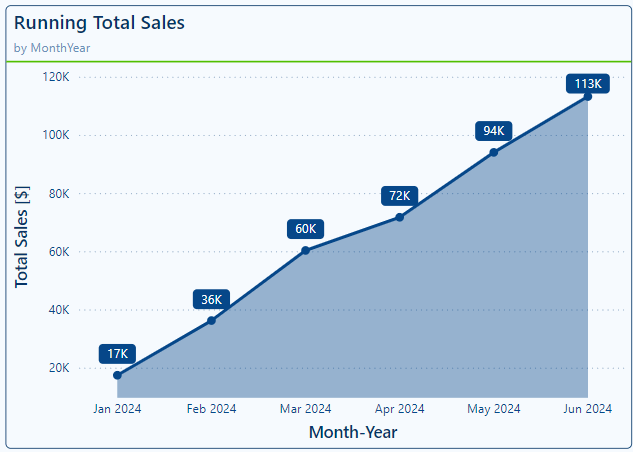
A standard area chart fills the area below the series line making it easy to see both the trend and volume of the dataset over time. We can use this chart to display continuous data where the emphasis is on the total value represented by the area. For example, we can use an area chart to visualize our year-to-date running total sales for our dataset.
Stacked Area Chart
The Stacked Area Chart is an extension of the basic area chart, where multiple data categories are stacked on top of each other. Each category is represented by a different colored area, showing the contribution of each category to the total value. Similar to the stacked bar/column charts, this chart type is useful for visualizing the contribution of different categories to the whole.
For example, we will update our Running Total Sales to show each region’s contribution to the running total over time. By stacking the areas, it becomes clear how each region’s sales trend and compare to the others. This chart is effective when we need to show the relationship between multiple data series and their cumulative impact on a metric.

100% Stacked Area Chart
The 100% Stacked Area Chart is similar to the stacked area chart but shows the relative percent contribution of each category to the total. Each area is normalized to fill 100% of the y-axis, making it easy to see the proportional contribution of each category over time. This type of area chart is ideal for when we need to compare the relative size of different categories.
For example, with a 100% Stacked Area chart we can update our Running total sales visual to show how each sales region contribution to our annual total sales has changed throughout the year. This provides a different method to visualize and understand how each of our sales regions contribute to our total sale through time.

Each of these area chart types provides a unique way to visualize data, offering us flexibility and depth to our data analysis. Understanding when and how to use each different type can greatly enhance our ability to communicate data insights effectively.
Customizing Area Charts
Customizing our area charts allows us to ensure our charts are informative as well as visually appealing and effectively communicate our data insights. Let’s explore several customization options to enhance our area charts.
Fill Colors and Transparency
To make sure our area charts are visually consistent with other visuals in our report we can set the color of each series and adjust the transparency to get the visual just right. For example, a common theme within our Sales report is to visualize our regions using a green color palette.
So, when creating the Running Sales stacked area chart above, we set the color for each sales region explicitly to ensure consistency.
Power BI provides us two property groups to help customize the line and fill color of our area charts. The first is setting the line color, here we can select each series we want to customize from the Series dropdown and apply the desired formatting. The other is the Shade area properties that we can customize. By default, the Match line color is toggled on however, if required we can toggle this option off and set the area color to a specific color.

Data Labels and Markers
By using data labels and markers we can enhance the clarity of our area charts by displaying the exact values and providing our viewers the information they require at just a glance. To label our area charts we can utilize data and series labels and for our stacked area charts we also have a total label property. Let’s explore each of these on Running Total Sales stacked area chart.
We will start by formatting the data labels. The data labels will be formatted the same for all our regional sales series. We set the color to a dark green color, and then under Options we set the position to inside center. This will show each regional contribution to the total cumulative sales and display it in the center of the shaded area.
Next, we toggle on the Total labels to show the cumulative total of our sales through time. To distinguish this value from the data labels, we set the background of the label to a darker green, transparency to 0%, and then set the color of our values to white.
Lastly, to better clarify what each area on our chart represents, we turn on the series labels. We position the series labels on the right side of the chart and format the series colors to correspond with the line/area color for each series.

In addition to using data labels, we can identify each data point using markers. We can also set different marker for each data series to continue to provide our viewers visual cues to differentiate our series. Here, we set the Asia sales regions to use circle markers, the Europe sales region to use diamond markers, and the United States sales region to use square markers.
Other Customizations
Like our line charts there are many other customization options available then we explored here. Check out Part 1 of this series for details on customizing our visual’s x- and y-axis, legend, gridlines, tooltips, and more.
Explore Power BI Core Visualizations: Part 1 – Bar and Column Charts
Chart your data journey! Transform data into insights with Power BI core visualizations.
By customizing our area chart, we can create a compelling visual narrative that highlight the key data trends in our data. To maximize our visual’s clarity when it includes multiple data series (e.g. stacked area charts) it’s important to use clearly distinguished colors and to avoid displaying areas that excessively overlap. By effectively leveraging our customization options, we can enhance our visuals ensuring our data tells a compelling story.
Ribbon Chart
A ribbon chart is a unique and powerful visual that showcases rankings of different categories. These charts highlight both the rank of the categories within and across different groupings. A ribbon chart is particularly effective in scenarios where we want to understand the flow and change of ranks over different groupings, such as the totals sales of product categories across our different sales regions.

The customization options available for us for our ribbon charts are similar to the options we have already explored in the previous sections, so we won’t explore then again here. For example, in the above visual we leveraged total labels, data labels, and specific colors for our columns.
Ribbon charts can be a powerful tool for visualizing ranking and trends, providing valuable insights into the relative performance of different categories. By effectively utilizing ribbon charts in our reports, we can provide our viewers an informative and unique visual that drives deeper insights.
Advanced Techniques and Customizations
Enhancing our Line and Area charts with advanced techniques and customizations can help us elevate the clarity and impact of our visuals. Let’s explore some examples.
Plotting Year over Year Comparisons
Year-over-year comparisons can help improve our understanding of trends and annual patterns in our data. Using a line chart allows us to clearly visualize these patterns.
Here is the plot we will be creating to provide year-over-year insights to our viewers.

First, we ensure our data includes the proper time dimension, in this example we use the total sales for each month. We start building the visual by adding a Total Sales measure to the y-axis of our line chart and our Month time dimension to the x-axis.

We can see now that our plot displays the Total Sales for each month. To separate and distinguish the monthly total sales for each year we add our Year time dimension to the chart’s Legend field.

The line chart now shows the monthly Total Sales for each year within our dataset. To enhance the clarity of this visual and highlight the current year we continue to format this visual.
To start, we use the Line properties for each series to improve the visual distinction between the previous years and the current year. We set the color of the 2022 series to a light blue and set the line style to dotted, 2023 we set the color to a slightly darker blue and the line style to dotted. Lastly, we set 2024 to a dark blue, keep the line style as solid and increase the width to 4px.
Then we move to adding line markers to give our viewers more precise information on each monthly value. For all of the data series we set the marker type to a circle. For the 2022 and 2023 series the marker size is 3px and then to better highlight the 2024 values we increase the size to 5px.
Lastly, to display the specific monthly values for only 2024 we enable Data labels and then for the 2022 and 2023 we toggle Off the Show for this series option. To ensure the data labels for 2024 sales stands out and are easy to read we set the background of the label to the same color as the series line and set the transparency to 0%, and the Value color to white.
These formatting options gives us our final visual.
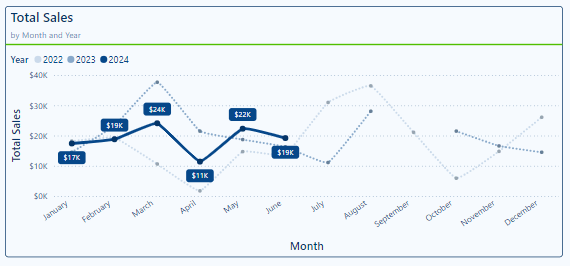
By using this approach, we can quickly compare our year-over-year total sales while highlighting the data our viewers are most interested in.
Conditional Formatting Based on Data Thresholds
In the above year-over-year line chart we used line style and color to distinguish our data series and highlight data. Conditional formatting provides us another excellent way to draw attention to key data points. By using conditional formatting, we can automatically change the color of various chart components based on defined thresholds.
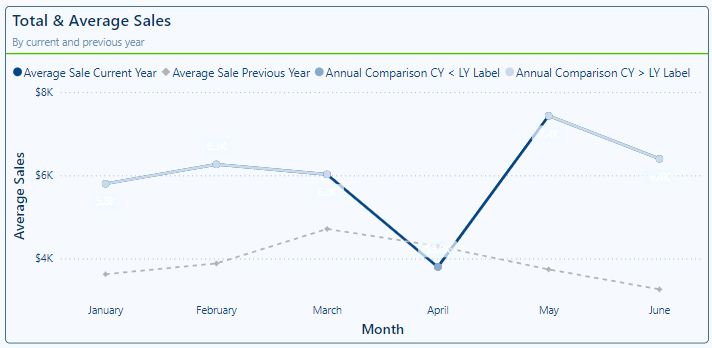
The goal with this plot is to highlight for our viewers when the current year’s average monthly sales are above or below the previous year’s average monthly sales. Here is the final visual.

To create this visual we have two measures, the first calculates the monthly average sales for the current year and the second calculates the monthly average sales for the previous year.
In addition to these two measures, we create three new measures to assist with labeling and formatting the specific data points.
Annual Comparision = [Average Sale Current Year] - [Average Sale Previous Year]

Annual Comparison CY < LY Label =
If([Annual Comparision] < 0,[Average Sale Current Year])

Annual Comparison CY > LY Label =
If([Annual Comparision] > 0,[Average Sale Current Year])
The first measure provides us a comparison of the current year sales and the previous year sales. We then use this to create the label measures.
Once we have our measures, we start constructing our visual by adding a Line and Clustered Column chart to our report. To create this visual we use the Line and Cluster chart, this allows us to add multiple series to the Line y-axis field.
We start by adding both of the average monthly sales measures to the line y-axis data field of the visual and our MonthName time dimension field to the x-axis data field. Then format the lines in a similar fashion that we did in the above example.

We then add the Annual Comparison CY < LY Label and Comparison CY > LY Label measures to the visual. On this visual the ordering of the data series is important. The order of the measures in the Line y-axis data field is Average Sale Current Year, Average Sale Previous Year, Annual Comparison CY < LY, and lastly Annual Comparison CY > LY.
Now that all of the series we need are added to our visual we need to enhance it with our customization and formatting.
Since the only lines we want on the visual are the Average Sale Current Year and Average Sales Previous Year, we start by setting the Line width of the Annual Comparison measures to 0px and the color to the same color as the visual background color so the dot for these series cannot be seen in the legend.

We then move to formatting the markers for the Annual Comparison series. For the Annual Comparison CY > LY Label series we set the marker size to 6px and color to green, and for the Annual Comparison CY < LY Label series we set the marker size to 6px and the color to red.
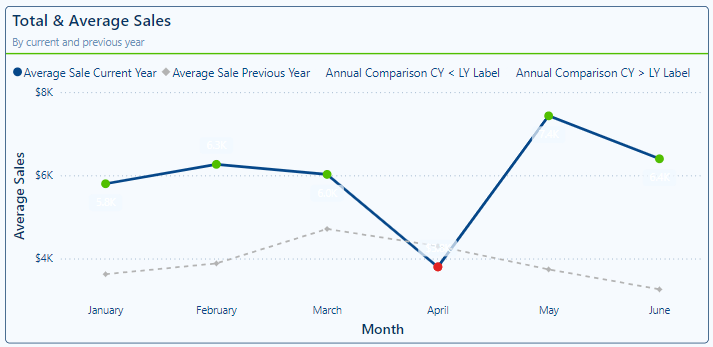
Lastly, for the data labels that we will apply to the Annual Comparison series we add another measure that we can use to show the percent difference between the previous year average sales and the current year average sales.
Annual Comparison Percent Difference =

VAR _percentDiff = ([Average Sale Current Year]-[Average Sale Previous Year])/(([Average Sale Current Year]+[Average Sale Previous Year])/2)

RETURN

IF(_percentDiff <0, "▼ " & FORMAT(ABS(_percentDiff), "0.0%"), "▲ " & FORMAT(_percentDiff, "0.0%"))
We toggle on our Data labels property, and then toggle off Show for this series for our Average Sales Current Year and Average Sales Previous Year series.
Then for the Annual Comparison CY < LY Label series under the Options property settings we set the Position (line) setting to Under, set the Value field to the Annual Comparision Percent Difference measure, the color of the value to white, and the background of the label to the same red color as the marker with a transparency of 0 %.
We format the Annual Comparison CY > LY Label series in a similar fashion, however, we set the Position (line) to Above and the background color to the same green we used for the marker.
Lastly, we rename the Annual Comparison measures for the visual and clear the series name so like the marker in the legend the series name is not shown.
Using conditional formatting helps us make our visuals more informative by visually emphasizing data points that meet certain criteria.
Visualizing Thresholds with Area Charts
Visualizing threshold or ranges with area charts can be a useful and powerful way to compare actual performance against a benchmark or target. We can use this approach to compare our historic actual sales to the forecasted value and visualize the forecasted data projected into the future.
This is the visual we will be creating.

We start to build this visual by adding an Area chart to our report. Then a time dimension hierarchy to the x-axis to plot the values for each year and month and add our Actuals Sales and Forecast measures to the plot.
We then format these series. For our Actual Sales series we set the line color to green with a width of 4px, we toggle off the Shade area setting and set the markers to circles with a dark green color. Then for the Forecast series we set the line color to gray with a width of 3px, we toggle off the Shade area setting, and toggle off the markers.

Then we add our Forecast Upper Limit and Forecast Lower Limit measures to the visual. The order of the series is essential to have the visual display correctly. The order should be Sales Actual, Forecast, Forecast Upper Limit, and lastly Forecast Lower Limit.
After adding the Upper and Lower Limit series we must format them to display just the way we want. For both the Forecast Upper and Lower Limit series we set the Line color to a light gray, and toggle off the Show for this series option for both the Line and Markers properties. Then we move to the Shade area properties, and for the Forecast Lower Limit series we toggle off Match line color and set the share area color to the same color as our visual background with the area transparency set to 0%.
Lastly, we ensure the visual is just right by setting the x-axis and y-axis titles and toggling off the built-in Legend. In place of the built-in legend, we construct a custom Legend to better identify each component on the visual.
Once all our customizations are complete, we have a visual packed with information that allows our report viewers to easily compare our historic actual sales to the forecasted values and view the forecasted sales projected into the future.
Wrapping Up
In this second part of this series on Power BI core visuals, we explored the versatility and power of Line and Area Charts along with their variations and combinations. Line Charts help us track changes over time with clarity, making them a perfect tool for trend analysis and performance monitoring. Area Charts add a layer of visual emphasis on cumulative data allowing for a visual understanding of volumes in addition to trends. The hybrid charts, combing Line and Column Charts offer a multifaceted view of our data allowing us to provide our report viewers comprehensive insights.
By understanding the strengths and weaknesses of these charts we are able to identify opportunities to leverage them to create more informative and visually appealing reports in Power BI.
Stay tuned for Part 3, where we will delve into Pie, Donut, and Treemap visuals. We explore how they can help us provide a quick snapshot of proportional data, discuss their limitations, and where they fit into our visualization toolkit.
Thank you for reading! Stay curious, and until next time, happy learning.

And, remember, as Albert Einstein once said, “Anyone who has never made a mistake has never tried anything new.” So, don’t be afraid of making mistakes, practice makes perfect. Continuously experiment, explore, and challenge yourself with real-world scenarios.
If this sparked your curiosity, keep that spark alive and check back frequently. Better yet, be sure not to miss a post by subscribing! With each new post comes an opportunity to learn something new.
