
A Beginner’s Guide to Exploring Data Models with DAX Queries
Getting Started with DAX Query View
DAX Query View in Power BI Desktop lets us interact directly with our data model using DAX queries. It provides a dedicated workspace for executing queries to explore data and validate calculations.
Clarifying the difference between DAX formulas and DAX queries here is essential, as they may become confused.
We use DAX formulas to create measures and calculated columns to extend our data model. We use DAX queries to retrieve and display existing data within our data model.
Whenever we add a field to a report or apply a filter, Power BI executes the DAX query required to retrieve and display the results. With DAX Query View, we can create and run our own DAX queries to test, explore, and validate our data models without impacting the design or outputs of our report.
Don’t just read; get hands-on and follow along with the example report provided here:

This dynamic repository is the perfect place to enhance your learning journey.
Navigating DAX Query View
We access DAX Query View within Power BI Desktop by selecting the DAX Query View icon in the left-hand Power BI view navigation.
DAX Query View contains several key components that we will become familiar with.

Command Palette: the command palette in the ribbon (or CTRL+ALT+P) provides a list of DAX query editor actions.
DAX Query Editor: this is where we write and edit our DAX queries. The editor includes features such as syntax highlighter, suggestions, and intellisense to help us construct and debug our queries.
Results Grid: when we execute a query, the data retrieved by our query appears in the results grid at the bottom of the DAX Query View window. The results grid provides instant feedback on our query or calculation outputs. When we have more than one EVALUATE statement in the Query Editor, the results grid has a dropdown we can use to switch between the results of each EVALUATE statement.
Query Tabs: located at the bottom of the DAX Query View window, different query tabs allow us to manage and navigate between multiple queries. We can create, rename, and navigate between them quickly and easily. Each tab displays a status indicator helping to identify each query’s current state (has not been run, successful, error, canceled, or running).
Data Pane: the data pane lists all the data model’s tables, columns, and measures. It provides a reference point when constructing our queries and helps us locate and include the necessary elements in our analysis. The data pane’s context menu also gives us various Quick Query options to get us started with common tasks.
For more details about the DAX Query View layout, check out the documentation: DAX Query View Layout.
Writing and Executing DAX Queries
In DAX Query View, we create and execute queries to explore and validate our data models in Power BI. DAX queries can be as simple as displaying the contents of a table to more complex, utilizing a variety of keywords.
Writing a DAX query involves using a structured syntax to retrieve data from our data model. While DAX queries provide an approach similar to SQL queries to explore our data, they are tailored specifically for working with our Power BI data model.
Every DAX query requires the EVALUATE keyword, defining the data the query will return. A DAX query at the most basic level contains a single EVALUATE statement containing a table expression.

This basic query retrieves all rows from the Sales table and is a straightforward way to examine the table’s contents without adding a table visual to our report canvas.
We can build on this basic example by refining the returned data further, for example, by applying a filter to return only sales with a sales amount greater than or equal to $9,000.

Optional Keywords and Their Usage
ORDER BY
ORDER BY sorts the results of our DAX query based on one or more expressions. In addition to the expression parameter, we specify ASC (default) to sort the results in ascending order or DESC to sort in descending order.
We can continue to build on our sales query by ordering the values by descending sales amounts and ascending sales dates.

START AT
START AT is used along with the ORDER BY statement, defining the point at which the query should begin returning results.
It is important to note that the START AT arguments have a one-to-one relationship with the columns of our ORDER BY statement. This means there can be as many values in the START AT statement as in the ORDER BY statement, but not more.
We continue to build out our basic query by adding a START AT statement to take our descending list of Sales amount and return values starting at $9,500 and return the remaining results.

DEFINE
DEFINE creates one or more reusable calculated objects for the duration of our query, such as measures or variables.
The DEFINE statement and its definitions precede the EVALUATE statement of our DAX query, and the entities created within the DEFINE statement are valid for all EVALUATE statements.
Entities are created within the DEFINE statement using another set of keywords: MEASURE, VAR, COLUMN, and TABLE.
Along with the entity keyword, we must provide a name for the measure, var, table, or column definition. After the name parameter, we provide an expression that returns a table or scalar value.
MEASURE
We use theMEASURE keyword within our DEFINE statement to create a temporary local measure that persists only during the execution of our DAX query.
When we use MEASURE to define a local measure with the same name as a measure in our data model during the execution of our DAX query, the query will use the measure defined within the query rather than the measures defined in the data model. This allows us to test or troubleshoot specific calculations without modifying the data model measure.

VAR
The VAR keyword within the DEFINE statement defines a temporary variable we can use in our DAX query. Variables store the result of a DAX expression, which we can use to make our queries more straightforward to read and troubleshoot.
We use VAR to create both query variables and expression variables. When we use VAR along with our DEFINE statement, we create a query variable that exists only during the query’s execution.

We can also use VAR within an expression along with RETURN to define an expression variable local only to that specific expression.

Other keywords to be aware of within our DEFINE statement include COLUMN and TABLE. These statements allow us to create temporary calculated tables or columns that persist only during the execution of our DAX query.
Stay tuned for a follow-up blog post that will discuss the details of working with these statements and the feature-rich external tool DAX Studio.
Practical Use Cases for DAX Query View
Quick Queries
Quick Queries in DAX Query View provide a fast and easy way to start exploring aspects of our data model. They are found in the context menu when we right-click a table, column, or measure within the Data pane.

For example, we can right-click our Sales table and select Quick queries > Show top 100 rows from the context menu. Selecting this option will create a new query tab containing the DAX query resulting in the top 100 rows of our Sales table by evaluating the functions SELECTCOLUMNS() with TOPN() and using the ORDER BY statement.
We can then modify this query to tailor the results to our needs, such as only showing the RegionId, SalesDate, and Amount columns.

When we right-click a column and view the Quick queries, we notice the available options change and provide a Show data preview query.

Selecting this option creates a new query tab showing the distinct values of the selected column. For example, we can use this quick query in our Sales table to view our distinct Sales regions.

Lastly, the quick queries available within the context of measures are Evaluate, define and evaluate, and define with references and evaluate.
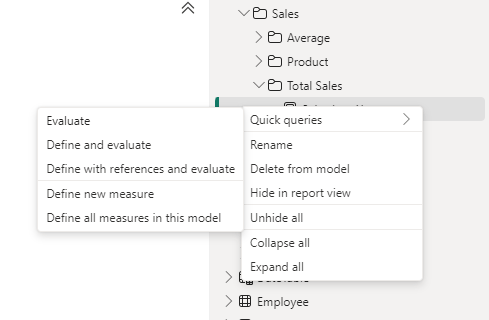
In our data model, we have a Sales Last Year measure. We can quickly view its value by right-clicking it and then selecting Quick queries > Evaluate.

This quick query uses SUMMARIZECOLUMNS(), which means we can quickly modify the query to add a group by column, such as Year.
We can hover over the Sales Last Year measure within the query editor window to view its DAX formula. Viewing this formula, we can see that this measure references another measure ([Total Sales]) within our data model.

We cannot view the formula for the referenced measure in the overlay. However, DAX Query View provides helpful tools to view this information. When we select a measure’s name in the query editor window, a lightbulb appears to the left.

Selecting this displays more actions available. Within the more actions menu, we choose Define with references to add a DEFINE statement to our DAX query where we can view the measure formulas. If our query already contains a DEFINE block, we will not see the lightbulb or the more actions menu.

The updated DAX query now displays the measure definitions. Note that we can get this result directly by right-clicking the measure, selecting the Define with references and evaluate quick query option.
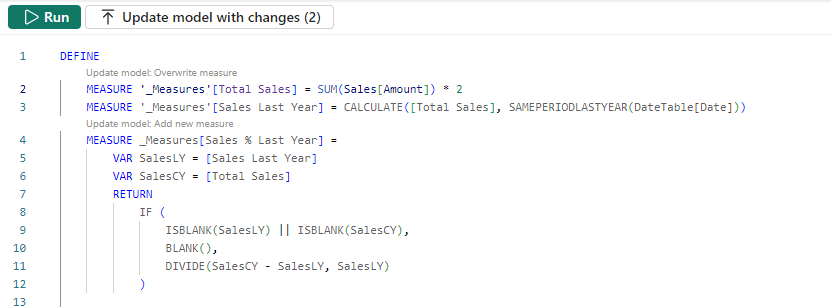
This DAX query can help test updates to the existing measures or assess the addition of new measures. For example, adding a new Sales % Last Year measure.

DAX Query View Measure Workflow
As we work with our measures in DAX Query View, it detects whether we have updated the DAX formula in an existing measure or created a new one. When a measure is updated, or a new measure is added, Query View CodeLens appears as a clickable superscript.
For example, if we update our Totals Sales measure to double it, we see the CodeLens providing us the option to update the measure within our data model. For the new Sales % Last Year measure, CodeLens gives us the option to add the new measure to the data model.
Using the measure quick queries and CodeLens assists us in streamlining our measure development workflow.
Documenting Data Models
We can also use DAX Query View to help document our data model by creating and saving queries that output model metadata.
For example, we can use the Define all measures in this model quick query to quickly create a DAX query that defines and evaluates all the measures.
In addition to viewing all the measures and their definitions in a single window, we can also use different features to understand our measures, such as using the Find option on the top ribbon to search and locate specific text (e.g. a measure’s name).
INFO Functions
DAX also includes various INFO functions that provide additional metadata on our data model to assist in documenting it. Key INFO functions include INFO.TABLES, INFO.COLUMNS, INFO.RELATIONSHIPS and INFO.MEASURES.
INFO.TABLES retrieves data about the tables in our data model, including their names, descriptions, and whether the table is hidden.
INFO.COLUMNS provides metadata for all the columns within our data model, including the column name and data type.
INFO.RELATIONSHIP provides details about the relationships between our data model tables, such as if the relationship is active, the from table and column ID, and the to table and column ID.
INFO.MEASURES lists all the measures in our data model, including their name, description, expression, and home table ID.
Since the INFO functions are just like other DAX functions, we can use them together with other DAX functions that join or summarize tables.
For example, our INFO.MEASURES function provides us with a list of all our measures. However, it just provides the home table ID, which may not be as helpful as the table name. We can create a DAX query that combines the required information from INFO.MEASURES and INFO.TABLE and returns a table with all the information we seek.

We can then review these results in the Query View results pane and save the query for future reference.
Also, check out the INFO.VIEW.COLUMNS, INFO.VIEW.MEASURES, INFO.VIEW.RELATIONSHIPS, INFO.VIEW.TABLES functions that provide similar results with the added benefit of being able to be used to define a calculated table stored and refreshed with our data model.
Optimizing Model Performance
DAX Query view also plays a role in performance optimization when we pair it with Power BI’s Performance Analyzer tool. The visuals on our report canvas get data from the data models using a DAX query. The Performance Analyzer tool lets us view this DAX query for each visual.
On the Report view, we run the Performance Analyzer by selecting the Optimize option on the ribbon and then Performance Analyzer. In the Performance Analyzer pane, we select Start recording and then Refresh visuals on the ribbon. After the visuals are refreshed, we expand the title of the visual we are interested in and choose the Run with DAX query view option to view the query in DAX Query View.
Using the Run in DAX Query View option, we review the query captured from a visual. By identifying slow-running queries and isolating their execution in DAX Query View, we can optimize DAX expressions and streamline calculations for better overall performance.
Wrapping Up
DAX Query View in Power BI Desktop creates additional possibilities for exploring our data model. Providing a dedicated workspace for writing, executing, and saving DAX queries enables us to dive deeper into our model, test calculation logic, and ensure accuracy without impacting our report or model structure.
Stay tuned for upcoming blog posts on how we can use external tools to go even further in understanding our data models using DAX queries.
To continue exploring DAX Query View, visit the following:
DAX query view – Power BI | Microsoft Learn
DAX Queries – DAX | Microsoft Learn
Thank you for reading! Stay curious, and until next time, happy learning.

And, remember, as Albert Einstein once said, “Anyone who has never made a mistake has never tried anything new.” So, don’t be afraid of making mistakes, practice makes perfect. Continuously experiment, explore, and challenge yourself with real-world scenarios.
If this sparked your curiosity, keep that spark alive and check back frequently. Better yet, be sure not to miss a post by subscribing! With each new post comes an opportunity to learn something new.
