Discover how to personalize your reports and show each user only the data they require in just a few clicks.
When creating reports for teams across various departments or regions, it’s important to recognize that not everyone needs or wants to see the same data. This is where Row-Level Security (RLS) becomes essential.
We can use RLS to restrict data access for report viewers based on their identity. This eliminates the need to create separate reports for different departments or regions. With RLS, we can use a single report and dataset to generate personalized views for each individual or role.
In this guide, we will walk through:
- What RLS is and why we should use it
- Static vs Dynamic RLS
- Step-by-step examples for each
- Limitations and Considerations when implementing RLS
By the end of this guide, you will better understand RLS, its applications, and its limitations. Additionally, a PBIX example file will be provided for in-depth, hands-on exploration of this topic.
What is Row-Level Security
Row-level Security (RLS) within Power BI restricts data access for report viewers based on their identity by enabling us to establish rules within our data model to filter data rows.
Consider it as always adding another filter to the appropriate users. These filters are applied at the dataset level, ensuring that users can only see the information they can access, regardless of how they interact with the report
It is important to note that users who have more than viewer permissions to the Power BI workspace have access to the entire semantic model. RLS only restricts data access for users with Viewer permissions.
Why use Row-Level Security
There are several key advantages to using Row-Level Security (RLS) when creating our reports.
Security and Privacy
RLS helps prevent users from seeing data they shouldn’t have access to. This can become especially important when the dataset includes sensitive data.
Efficiency and Scalability
Managing separate reports for different departments or roles can be cumbersome. With RLS, we can create and customize one report for each user role. This approach is easier to maintain, scales better, and reduces the likelihood of inconsistencies and errors.
Improved User Experience
Users no longer need to apply slicers or filters to view only their data of interest. RLS automatically handles this when the report is rendered, resulting in a cleaner and more user-friendly report.
Static Row-Level Security
Static Row-Level Security (RLS) is the most straightforward form of RLS. In this approach, we manually define which users can access specific rows of data, usually by applying filters based on criteria such as Region or Department. This method works well when there is a small group of users and the access rules do not change frequently.
Step-by-Step: Static RLS
Static RLS applies a fixed value in the DAX filter when rendering our report. Configuring static RLS involves several steps.
1. Creating RLS roles in Power BI Desktop
To create RLS roles in Power BI Desktop, navigate to the Modeling tab and select Manage Roles.

Then, we select + New under Roles on the manage security roles dialog box. For this sample report, we create a role for each sales region.
We give each role a descriptive name, select the table to which the filter is applied, and create the filter condition.

After each role is created, any user we assign to the Asia, Europe, or United States role will only see data filtered to that specific region.

This approach is considered Static RLS since we use a static value to define each role.
2. Testing the roles in Power BI Desktop
Within Power BI Desktop, we can test each role to validate it by selecting the View as option on the modeling tab.

After selecting a role, we can see the report rendered as if we are a member of that role.

3. Deploying the report to the Power BI Service
Once we create and validate the roles, we publish the report to the Power BI Service as with any other report.
4. Add members to the role in the Power BI Service
To add a member to the role in the Power BI Service, we must navigate to the workspace where we published the report. We locate the semantic model and select the More options ellipsis (…) and then Security.
Within the Row-Level Security screen, we add users or security groups to each role we created. RLS rules will not apply to users who have access to the report but have not been added to a role.

5. Testing the roles in the Power BI Service
On the Security screen, we select the More options ellipsis (…) next to each role and then Test as role.

Once all roles have been validated, we have successfully implemented static row-level Security in Power BI.
Dynamic Row-Level Security
While static RLS can be great for smaller teams, it doesn’t scale well. Manually assigning roles to individuals quickly becomes unmanageable.
Dynamic RLS solves this issue using a User Access Table or a field that defines each user’s role inside our data model. The report utilizes this table to filter itself based on who is viewing the report.
For this example, our data model has an Employee table that contains each employee’s user principal name and role (e.g., Asia Sales, Europe Sales, US Sales, Management, or blank). We utilize this information to implement dynamic RLS by looking up the user’s role based on the user principal name of the viewer currently signed in.
Step-by-Step: Dynamic RLS
1. Set up a dynamic role using DAX
Navigate to the Modeling tab and select Manage Roles. Then, in the Manage Security Roles dialog box, select + New under Roles.
We name the role, select the table to which the filter is applied, and, this time, rather than creating a static filter condition, select Switch to DAX editor to create our dynamic rule.
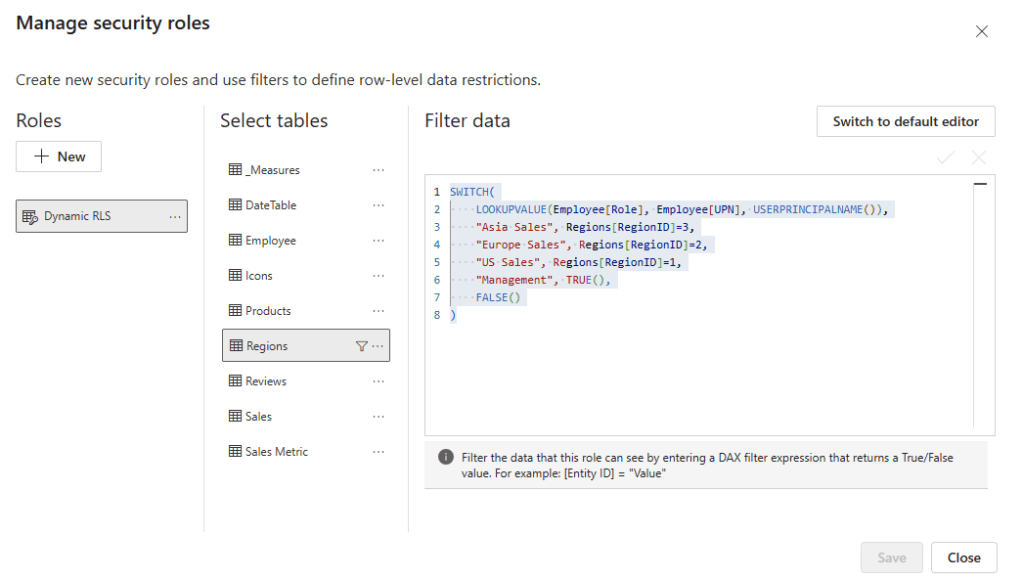
We filter the Region table based on the current user’s role using the following DAX expression:
SWITCH(
    LOOKUPVALUE(
        Employee[Role],
        Employee[UPN],
        USERPRINCIPALNAME()
    ),
    "Asia Sales", Regions[RegionID]=3,
    "Europe Sales", Regions[RegionID]=2,
    "US Sales", Regions[RegionID]=1,
    "Management", TRUE(),
    FALSE()
)
The DAX expression looks up the user’s Role based on the current user’s user principal name (e.g. email).
2. Testing the dynamic filter
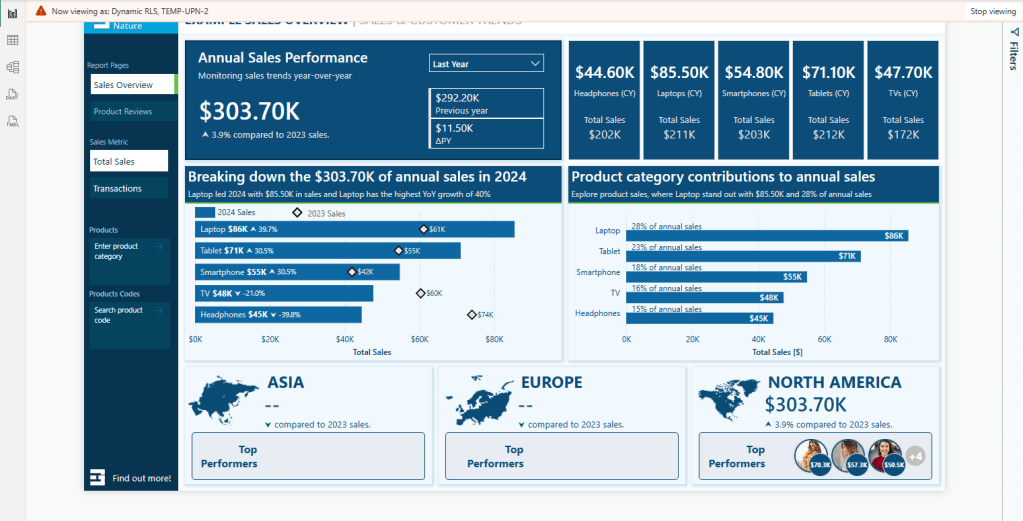
After creating the rule, we must test and validate that it functions as expected. We navigate to the Modeling tab and select View as. Then, in the dialog box, we check the Other User option and enter a user’s email. We also check the dynamic filter rule we just created and select OK.

The report will refresh, and we will validate that the TEMP-UPN-2 user, who has the role of US Sales, sees data only for their assigned region.
3. Publish the report and add members to the role
We publish the report to the Power BI Service. Then, to add members to the role in the Power BI Service, we must navigate to the workspace where we published the report. We locate the semantic model and select the More options ellipsis (…) and then Security.
Within the Row-Level Security screen, similar to what we did for static RLS, we can add users or security groups to each role we created.
Since we may implement dynamic row-level Security for better scalability, assigning a security group when adding members can be beneficial. Better yet, this security group can also give users their Viewer access to the report or app.
4. Validate roles in the Power BI Service
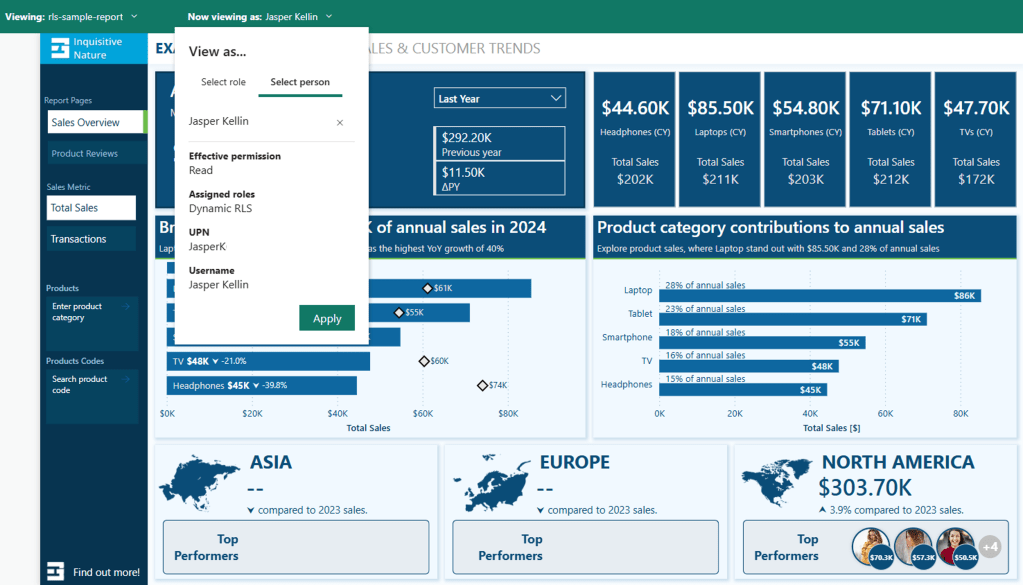
On the Security screen, we select the More options ellipsis (…) next to each role and then Test as role.
Then, at the top, we select Now viewing as and Select a person to validate that the RLS is functioning as expected. We will view the report as Jasper (TEMP-UPN-2) as we did in Power BI Desktop.
Note: The TEMP-UPN-# provided in the sample file will only function for testing in Power BI Desktop without requiring an actual email address. The UPN field must contain actual user email addresses to validate in the Power BI Service.
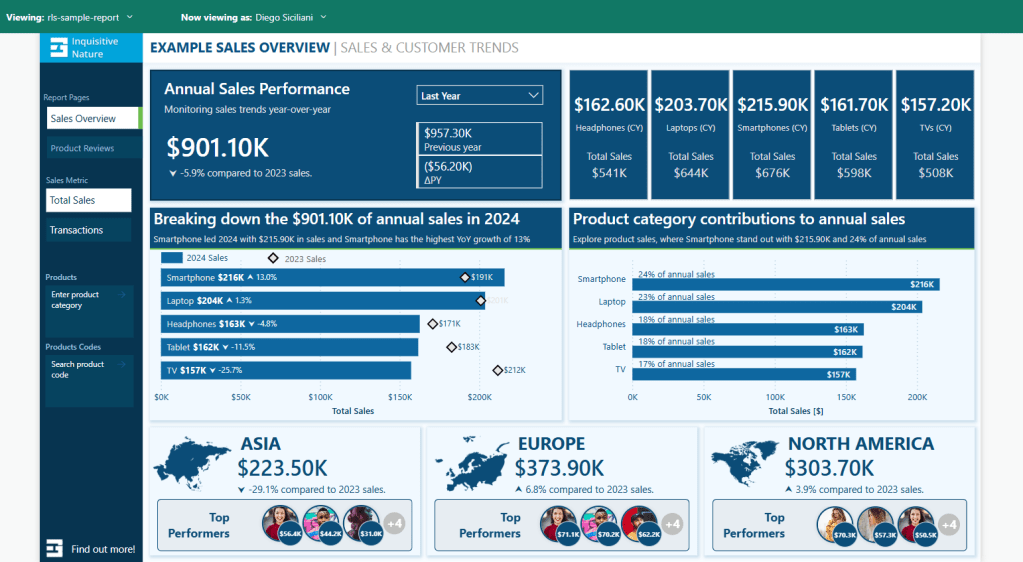
We can also validate the report for Diego (TEMP-UPN-4), who is assigned the Management role and should be able to see data for all sales regions
One last consideration is what happens when a user intentionally or unintentionally has access to view the report but does not have a Role defined in the Employee table.
If we review the DAX expression used for the filter:
SWITCH(
    LOOKUPVALUE(
        Employee[Role],
        Employee[UPN],
        USERPRINCIPALNAME()
    ),
    "Asia Sales", Regions[RegionID]=3,
    "Europe Sales", Regions[RegionID]=2,
    "US Sales", Regions[RegionID]=1,
    "Management", TRUE(),
    FALSE()
)
The last value, or the default if no other condition is true, is set to FALSE(). This means that if a user is in the Employee table but either does not have a role or their role doesn’t match one defined in the rule, the report will be empty.
When testing the report, Grady (TEMP-UPN-5) is contained in the Employee table but does not have a role assigned.

Now that everything is working as expected, we have successfully implemented dynamic row-level Security. The benefit is that by using dynamic RLS, we replace four roles with a single rule applied dynamically based on the current user. Additionally, we can add an extra layer and hide data for users who have access to the report but are not assigned a role in the Employee table.
Considerations and Limitations
Before implementing RLS across our reports, it is important to consider and evaluate the impacts of RLS limitations.
A list of limitations can be viewed here:

Row-Level Security with Power BI – Considerations and limitations
Learn more about: Row-Level Security with Power BI
It’s also important to understand when Row-Level Security (RLS) is and is not the right tool.
We may consider publishing multiple semantic models if we have only a few simple RLS rules. For example, if we have just two sales regions, we might publish a separate semantic model for each region. Although the semantic models do not enforce RLS, we can use query parameters to filter the source data to the specific sales region. The use of query parameters would still allow us to publish the same model while displaying the relevant data for each region.
Advantages of not using Row-Level Security (RLS) include:
- Improved Query Performance: With fewer filters applied to the data model, queries can run faster.
- Smaller Models: While avoiding RLS may increase the number of models, each individual model is generally smaller, which can enhance query performance and data refresh responsiveness.
- Full Access to Power BI Features: Certain features, like “Publish to the Web”, do not work with RLS.
However, there are also disadvantages to not implementing RLS:
- Multiple Workspaces Required: Each user audience for reports may require its own workspace.
- Content Duplication: Reports and dashboards must be created in each workspace, leading to redundancy and increased maintenance efforts.
- Lack of Consolidated View: Users who belong to multiple report user audiences must open various reports, resulting in no single, consolidated view of their data.
Wrapping Up
Row-Level Security (RLS) is a valuable feature in Power BI that enables us to protect and customize report data according to the identity of the report viewer. With static RLS, we can implement straightforward, fixed access rules, while dynamic RLS offers a more scalable and flexible solution. RLS allows us to provide tailored insights that meet the specific needs of different users.
It’s important to remember that Row-Level Security only filters rows in a table and does not limit access to model objects like tables or columns. If your requirements involve hiding entire tables or specific columns within a table, you should consider using Power BI Object-Level Security (OLS).
RLS can sometimes be overly restrictive when it comes to broader calculations. For example, we could display the total sales for each region to all users or calculate the percentage of total sales across all regions. However, RLS rules filter these total sales values, leading to complications. This is where the concept of partial RLS comes into play, allowing us to secure specific data while still accessing global context for certain calculations.
Stay tuned and subscribe so you won’t miss upcoming posts in this series, focusing on the partial RLS design pattern and object-level security.
If you’d like to follow along and practice these techniques, Power BI sample reports are available here: EMGuyant GitHub – Power BI Security Patterns.
Thank you for reading! Stay curious, and until next time, happy learning.

And, remember, as Albert Einstein once said, “Anyone who has never made a mistake has never tried anything new.” So, don’t be afraid of making mistakes, practice makes perfect. Continuously experiment, explore, and challenge yourself with real-world scenarios.
If this sparked your curiosity, keep that spark alive and check back frequently. Better yet, be sure not to miss a post by subscribing! With each new post comes an opportunity to learn something new.

2 thoughts on “Power BI Row-Level Security Explained: Protect Data by User Role”