Elevate Power Automate Error Handling with Centralized Failure Notifications


Handling errors in Power Automate workflows can be challenging, especially when managing notifications across multiple flows. Adding contact details to each flow can become inefficient and difficult to maintain.

The Microsoft ecosystem offers various options and integrations to address these inefficiencies. In this approach, we will use a SharePoint list to centralize contact information, such as Teams Channel IDs and Teams Tag IDs. This method simplifies management and enhances our failure notification framework.

We will explore two methods. The first involves using Teams shared channels with @mentioning Teams tags to notify a specific group of users within our Power Automate Failure Notifications Teams team. The second method utilizes direct user @mentions in private Teams channels. Both methods employ a solution-aware flow, providing a reusable failure notification framework.


Power Automate Error Handling Best Practices

Before we can send failure notifications using our reusable framework, we first need to identify and handle errors within our workflows. It is essential to incorporate error handling into all our business-critical workflows to ensure that our Power Automate flows are resilient and reliable.

The configure run after setting is crucial for identifying the outcomes of actions within a workflow. It lets us know which actions were successful, failed, skipped, or timed out. By utilizing this feature, we can control how subsequent actions will behave based on the result of prior actions. Customizing these settings allows us to develop flexible and robust error-handling strategies.

Beyond using configure run after, there are important patterns that support effective error management in Power Automate:

Scoped Control (Try-Catch blocks): Grouping actions within the Scope control object aids in managing the outcomes of that set of actions. This method is valuable for isolating distinct parts of our workflow and handling errors effectively.

Parallel Branching: Establishing parallel branches enables certain workflow actions to continue even if others encounter errors. This approach allows us to run error-handling notifications or fallback actions concurrently with the primary process, enhancing the resilience of our flow and preventing interruptions.

Do Until Loop: For situations where actions may need multiple attempts to succeed, the Do Until control object permits us to execute actions until a specified success condition is met or a failure condition triggers our error-handling process.

These patterns collectively improve the reliability of our workflows by incorporating structured and consistent error handling. Identifying errors is just the first step; we must also notify the relevant individuals when a workflow encounters an issue so they can determine if further action or bug fixes are necessary.

Managing error notifications across multiple workflows can be difficult when contact information, such as an email address, is hardcoded into each individual flow. To address this, we will explore centralizing error notification details using a SharePoint list. This approach allows us to separate contact management from the flow logic and definitions.


The Final Solution in Action

Using Teams and Shared Channels with @mentioning Teams tags offers a practical and flexible solution. Teams tags enable us to group team members by their responsibilities, such as Development Team or workflow-specific groups. Using Teams tags makes it easy to alert an entire group using a single @mention tag.

In this example, we implement the Scoped Control (Try-Catch blocks) error handling pattern. This pattern groups a related set of actions into a scope, so if any action fails, we can handle the errors using an associated catch scope.

Here’s a basic flow that is triggered manually and attempts to list the members of a Teams Group chat.

When a non-existent Group chat ID is provided, the List members action will fail. This failure triggers the CATCH scope to execute. The CATCH scope is configured to run only when the TRY scope fails or times out.

When the CATCH scope executes, the flow filters the result of the TRY scope to identify which action failed or timed out using the following expressions:

From:
result('TRY_Teams_list_members_made_to_fail')
Criteria:
@or(equals(item()?['status'], 'Failed'), equals(item()?['status'], 'TimedOut'))

Next, the flow utilizes the reusable notification framework to send a notification to Teams identifying that an error has occurred and providing details of the error message. We use the Run a Child Flow action and select our reusable error notification workflow for this purpose. This workflow requires three inputs:

workflowDetails: string(workflow())
errorMessage: string(outputs('Filter_TRY_Teams_list_member_result')?['body'])
scopeName: manually entered

When this workflow is triggered, and the TRY scope fails, we receive a Teams notification dynamically sent to the appropriate channel within our Power Automate Failure Notification Team, alerting the necessary individuals using the Dev Team Teams tag and direct @mentioning the technical contact.

The advantage of this approach and framework is that the notification solution only needs to be built once, allowing it to be reused by any of our solution-aware and business-critical workflows that require error notifications.

Additionally, we can manage the individuals alerted by managing the members assigned to each Teams tag or by updating the technical and functional contact details within our SharePoint list. All these updates can be made without altering the underlying workflow.

Continue reading for more details on how to set up and build this error notification framework. This post will cover how the Power Automate Failure Notifications Teams team was set up, provide resources on Teams tags, demonstrate how to create and populate a centralized SharePoint list for the required notification details, and finally, outline the construction of the failure notification workflow.


Setting Up Teams

Our error notification solution utilizes a private Microsoft Team, which can consist of both shared and private channels.

Shared channels are a convenient and flexible option for workflows that are not sensitive in nature. By using shared channels, we can take advantage of the List all tags Teams action to notify a group with a single @mention in our error notifications.

For additional information on managing and using Teams tags, see the resources below:

Microsoft Learn – Manage tags in Microsoft Teams

Microsoft Support – Using tags in Microsoft Teams

Private channels should be used when the workflow involves more sensitive information or when error notifications need to be restricted to a specific subset of team members. In this case, the error notifications target specific individuals by using direct user @mentions.


Centralized Error Notifications Details with SharePoint

To improve the maintainability of our error notifications, we will centralize the storage of key information using a SharePoint list. This approach enables us to store essential details, such as functional and technical contacts, Teams channel IDs, Teams Tag IDs, workflow IDs, and workflow names in one location, making it easy to reference this information in our error notification workflow.

The SharePoint list will serve as a single source for all required flow-related details for our notification system. Each entry in the list corresponds to a specific flow. This centralized repository minimizes the need for hardcoded values. When teams or contact details change, we can simply update the SharePoint list without the need to modify each individual flow.

Steps to Create the SharePoint List

Create a New List: In SharePoint, create a new list with a descriptive name and an appropriate description.

Add Required Columns: Include all necessary required and optional columns to the new SharePoint list.

FlowDisplayName: identifies the specific flow that utilizes the error notification system we are creating.

FlowId: unique identifier for the workflow associated with the error notification system.

Technical Contact: the primary person responsible for technical oversight who will be notified of any errors.

Functional Contact: secondary contact, usually involved in business processes or operational roles.

TeamsChannelName: name of the Teams Channel where error notifications will be sent.

TeamsChannelId: unique identifier for the Teams Channel that the flow uses to direct notifications.

TeamsTagId: this field is relevant only for shared channel notifications and contains the ID of the Teams Tag used to notify specific groups or individuals.

Populate the List with Flow Details

Our failure notification system will send alerts using the Post message in a chat or channel action. When we add this action to our flow, we can use the drop-down menus to manually select which channel within our Power Automate Failure Notifications team should receive the message.

However, it’s important to note that the Channel selection displays the channel name for convenience. Using the peak code option, we can see that the action utilizes the Channel ID.

        parameters": {
            "poster": "Flow bot",
            "location": "Channel",
            "body/recipient/groupId": "00000000-0000-0000-0000-000000000000",
            "body/recipient/channelId": "00:00000000000000000000000000000000@thread.tacv2",
            "body/messageBody": ""
        }

The same applies when using the Get a @mention token for a tag. To dynamically retrieve the token, we need the Tag ID, not just the Tag name.

These key pieces of information are essential for our Failure Notification solution to dynamically post messages to different channels or @mention different tags within our Failure Notification team.

While there are various methods, such as peek code, to manually find the required values, this can become inefficient as the number of flows increases. We can streamline this process by creating a SharePoint Setup workflow within our Failure Notification solution.

This workflow is designed to populate the SharePoint list with the details necessary for the dynamic error notification framework. By automatically retrieving the relevant Teams channel information and Teams tag IDs, it ensures that all the required data is captured and stored in the SharePoint list for use in error notification flows.

SharePoint Set Up Workflow

This workflow has a manual trigger and allows us to run the setup as needed by calling it using the Run a Child Flow action when we want to add our error notifications to a workflow.

The inputs consist of 6 required string inputs and 1 optional string input.

channelDisplayName (required): the channel display name that appears in Teams.
workflowId (required): the flow ID to which we add our error notifications. We can use the expression: workflow()?['name'].
workflowDisplayName (required): the display name of the flow to which we are adding our error notifications. We can manually type in the name or use the expression: workflow()?['flowDisplayName'].
technicalContact (required): the email for the technical contact.
functionalContact (required): the email for the functional contact.
workflowEnvironment (required): the environment the flow we are adding the error handling notifications to is running in. We can use the expression: workflow()?['tags']?['environmentName']
tagName (optional): the display name of the Teams tag, which is manually entered. This input is optional because the error notification solution can be used for Shared or Private Teams channels. However, @mentioning a Teams tag is only utilized for Shared channels.

Following the trigger, we initialize two string variables. The first ChannelId and the second TagId.

Get the Teams Channel ID

The next set of actions lists all the channels for a specified Team and uses the channelDisplayName input to extract the ID for the channel and set the ChannelId variable.

The Teams List channels action retrieves a list of all available channels in our Power Automate Failure Notifications Teams team. The Filter array action then filters this list based on the channelDisplayName input parameter.

The flow then attempts to set the ChannelId variable using the expression:
outputs('Filter_array_to_input_teams_channel')['body'][0]?['id'].

However, if the output body of the Filter array action is empty, setting the variable will fail. To address this, we add an action to handle this failure and set the ChannelId to “NOT FOUND”. This indicates that no channel within our Power Automate Failure Notifications team matches the provided input value.

To achieve this, we use the Configure run after setting mentioned earlier in the post and set this action to execute only when the TRY Set ChannelId action fails.

Get the Teams Tag ID

After extracting the Teams Channel ID, the flow has a series of similar actions to extract the Tag ID.

Create an item on the SharePoint List

Lastly, the flow creates a new item on our supporting SharePoint list using the flow-specific inputs to store all the required information for our error notification solution.


Reusable Error Notification Flow Architecture

As the number of our workflows increases, a common challenge is developing a consistent and scalable error notification system. Instead of creating a new notification process for each workflow, we can leverage reusable solution-aware flows across multiple workflows within our environment. This approach minimizes duplication and streamlines our error notification processes.

Flow Structure for Reusable Notifications

The reusable notification flow is triggered when an error occurs in another workflow using the Run a Child Flow action and providing the required inputs.

The notification workflow parses the details of the workflow that encounters an error, creates an HTML table containing the details of the error that occurred, and then sends the notification using the centralized SharePoint list created in the previous section and dynamically alerts the appropriate individuals.

Trigger Inputs & Data Operations

We can catch and notify responsible parties that an error occurred in a workflow by calling this notification flow, using the Run a Child Flow action, and providing the workflowDetails, errorMessage, and scropeName.

workflowDetailsstring(workflow())
errorMessagestring(outputs(<FILTER_TRY_SCOPE_ACTION>)
scopeName: manually entered

After the trigger, we carry out two data operations. First, we parse the workflowDetails using the Parse JSON action and the expression json(triggerBody()?['text']) for the Content. Then, we create an HTML table using the information provided by our errorMessage input.

For the Create HTML table action, we use the following expressions for the inputs:

From:
json(triggerBody()?['text_1'])
Scope:
triggerBody()?['text_2'])
Action:
item()?['name']
Message:
concat(item()?['error']?['message'], item()?['outputs']?['body']?['error']?['message'],item()?['body']?['message'])

Retrieve Contact Information

The notification flow queries the centralized SharePoint list to retrieve the necessary contact details and Teams information associated with the workflow that encountered the error.

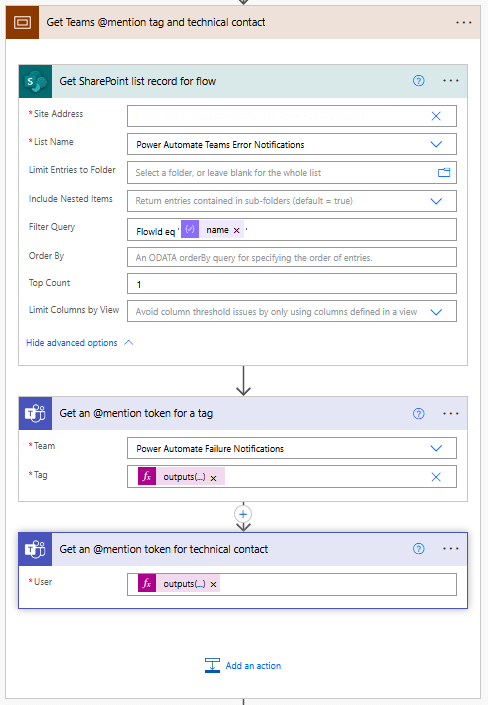
We begin this subprocess by using the SharePoint Get items action with the Filter Query:
FlowId eq 'body('Parse_workflowDetails_JSON')?['name']'.

Since each FlowID on our list should have only 1 record, we set the Top Count to 1.

Then, if our Power Automate Failure Notification Teams team uses Shared Channels, we use the Teams Get an @mention token for a tag and pass it the TagId stored within our SharePoint list using:
outputs('Get_SharePoint_list_record_for_flow')?['body/value'][0]?['TagId'].

If the notification team uses private channels, this action can be excluded.

Lastly, for both Shared and Private channel notifications, we use the Teams Get an @mention token for user action to get the token for the technical contact stored within our SharePoint list using:
outputs('Get_SharePoint_list_record_for_flow')?['body/value'][0]?['TechnicalContact']?['Email']

Send Teams Notification

Once we have retrieved the required contact details from SharePoint and Teams, the flow sends a notification to the appropriate Teams channel, notifying the relevant individuals. For Shared Channels, the message uses the @mention token for a Teams tag. If Private Channels are utilized, this should be removed from the flow and message.

Additionally, the message can be posted as the Flow bot when using Shared channels. However, when using Private channels, the message must be posted as User.

The flow dynamically sets the Channel using the ChannelId stored within our SharePoint list with the expression:
outputs('Get_SharePoint_list_record_for_flow')?['body/value'][0]?['ChannelId'].

The message begins by identifying the workflow in which an error was encountered and the environment in which it is running.

Error reported in workflow:
body('Parse_workflowDetails_JSON')?['tags']?['flowDisplayName'] {body('Parse_workflowDetails_JSON')?['tags']?['environmentName']}

Then, the message adds the HTML table created with the error message details using the following expression:
body('Create_HTML_table_with_error_action_and_message').

Finally, it notifies the contacts for the workflow by using the @mention tokens for the Teams tag and/or the technical contact. The message also provides the details on the functional contact using the expression:
outputs('Get_SharePoint_list_record_for_flow')?['body/value'][0]?['FunctionalContact']?['Email']

The notification process sends an informative and targeted message, ensuring all the appropriate individuals are alerted that an error has occurred within a workflow.

Reusability

This architecture enables us to develop a single workflow that can trigger error notifications for any new workflows, making our error handling and notification process scalable and more efficient.

By using this approach, we can avoid hardcoding notification logic and contact details in each of our workflows. Instead, we can centrally manage all error notifications. This reduces the time and effort needed to maintain consistent error notifications across multiple workflows.


Wrapping Up

This Power Automate error notification framework provides a scalable solution for managing notifications by centralizing contact information in a SharePoint list and leveraging solution-aware flows. Setting up a single, reusable notification flow eliminates the need to hardcode contact details within each workflow, making maintenance and updates more efficient.

The framework targeted two notification methods: Shared Teams channels with tags and Private Teams channels with direct mentions. This system ensures error notifications are delivered to the right individuals based on context and need.

Shared Channels with Teams Tags

This approach sends notifications to a shared Teams channel, with Teams tags allowing us to notify a group of individuals (such as a “Dev Team”) using a single @mention.

How It Works: The notification flow retrieves tag and channel details from the SharePoint list. It then posts the error notification to the shared channel, @mentioning the relevant Teams tag to ensure all tag members are alerted.

Advantages: This method is scalable and easy to manage. Team members can be added or removed from tags within Teams, so updates don’t require changes to the flow definition. This is ideal for notifying larger groups or managing frequent role changes.

Private Channels with Direct @Mentions

Private channels are used to send notifications directly alerting a technical contact when workflow and error details should not be visible to the entire Team.

How It Works: The flow dynamically retrieves contact details from the SharePoint list and posts the error notification to the private channel, mentioning the designated technical contact.

Advantages: This approach provides greater control over the visibility of the notifications, as access is restricted to only those users included in the private channel.

Each of these approaches is flexible and reusable across multiple workflows, simplifying the process of managing error notifications while ensuring messages reach the appropriate individuals based on the notification requirements.


Thank you for reading! Stay curious, and until next time, happy learning.

And, remember, as Albert Einstein once said, “Anyone who has never made a mistake has never tried anything new.” So, don’t be afraid of making mistakes, practice makes perfect. Continuously experiment, explore, and challenge yourself with real-world scenarios.

If this sparked your curiosity, keep that spark alive and check back frequently. Better yet, be sure not to miss a post by subscribing! With each new post comes an opportunity to learn something new.

Power Apps Tips: Visually Distinguishing Your App’s Environment


Are you tired of the confusion and mix-ups that come with managing Power Apps across multiple environments? We have all been there – one minute we are confidently testing a new feature, and the next, we are lost in a world of confusion until we realize we are in the production environment, not our development or testing environment. It can be both surprising, confusing, and disorienting.

But what if there was a way to make our apps and more importantly our users more environmentally aware. Imagine an app that clearly shows whether it is in development, testing, or production. This isn’t just a dream; it is entirely possible, and we are going to explore how. With a combination of environment variables, labels, and color properties, we can transform our apps and adjust their appearance all based on the environment they are in.

In this guide we will go from apps that are indistinguishable between environments.

To apps that are informative and allow us to develop, test, and use our apps with confidence.

Dive in and explore as we start with the basics of environment variables and then move to advanced techniques for dynamic configuration. By the end of the guide, we will not only learn how to do this, but it will become clear as to why this is helpful when managing Power Apps across different environments.

Here is what this guide will cover:

  1. Understanding Power Apps Environments and Environment Variables
    1. Introduction to Power Apps Environments
    2. The Role of Different Environments
    3. The Importance of Power Apps ALM
  2. The Significance of Environmental Awareness in Power Apps
    1. Common Challenges in Multi-Environment Scenarios
    2. Importance of Identifying the Current Environment
  3. Building The App
    1. Setting the Stage
    2. Creating the App in the Development Environment
    3. Extracting Environment Information
      1. Building the Power Automate Workflow
    4. Call the Workflow and Store the Outputs
  4. Adding the Environmental Visual Cues
    1. Adding Text Labels
    2. Environmental Specific Color Themes
    3. Deploying to Different Environments
  5. Wrapping Up: Ensuring Clarity and Efficiency in Your Power Apps

Understanding Power Apps Environments and Environment Variables

Power Apps is a fantastic and powerful platform that allows us to create custom business applications with ease. However, as our projects and solutions grow, we begin to dive into the realm of application development, and we encounter the need for efficient management. This is precisely where Power Apps environments step in to save the day.

Introduction to Power Apps Environments

Environments act as unique containers helping facilitate and guide us through the entire app development journey. Each environment is a self-contained unit, ensuring that our data, apps, and workflow are neatly compartmentalized and organized. This structure is particularly beneficial when managing multiple projects or collaborating with a team. Environments are like distinct workspaces, each tailored for specific stages of your app development journey.

These environments let use build, test, and deploy our applications with precision and control, ensuring that chaos never gets in the way of our creativity while crafting our Power Apps applications.

The Role of Different Environments

Let’s shed some light on the roles played by different environments. Environments can be used to target different audiences or for different purposes such as development, testing, and production. Here we will focus on staged environments (dev/test/prod) an environment strategy that helps ensure that changes during development do not break the app users’ access in our production environment.

First up is the development environment – the birthplace of our app ideas. It is where we sketch out our vision, experiment with various features and lay the foundation for our apps.

Next is the testing or QA environment which takes on the role of the quality assurance center. In this environment we examine our app, validate its functionality and user experience, and ensure everything works seamlessly and as expected before it reaches our final end users.

Lastly, we have our production environment, where our apps go live. It is the real-world stage where our apps become accessible to its intended users, interacts with live data, and requires stability and reliability.

The Importance of Power Apps ALM

We cannot get too far into exploring Power Apps environments, and environment strategies without mentioning Application Lifecycle Management (ALM). ALM is a pivotal aspect of successful software development, and our Power Apps are no exception. ALM within Power Apps helps ensure a smooth transition between the development, testing, and production phases of our projects. It encompasses maintaining version control, preventing disruptions, and streamlining the deployment process.

If you are curious to learn more about Power Apps ALM, I encourage you to visit the post below that discusses its different aspects including how to implement ALM, where Power Apps solutions fit into the picture, version control, change management, and much more.

Explore how ALM can enhance collaboration, improve performance, and streamline development in Power Platform solution. 


The Significance of Environmental Awareness in Power Apps

Common Challenges in Multi-Environment Scenarios

Navigating through multiple environments in Power Apps can sometimes feel like a tightrope walk. One common challenge is keeping track of which environment we are working in and what environment app we are accessing in our browser. It can be easy to lose track especially when we are deep in development and testing.

Image a scenario where we created a new feature in development, and as the developer we wish to verify this change before deploying the update to our testing environment. But as often happens, something comes up and we cannot check the functionality right away. When we come back later, we launch the app using the web link url, and we don’t see our expected update. Was it an issue how we developed the change, are we viewing the development app, are we viewing the testing app? All can lead us to more questions and confusion, that could be solved if our app clearly indicates the environment it resides in no matter how we access the ap.

Importance of Identifying the Current Environment

Informing us and other app users, especially those that may use the app across different environments, about the current environment is focused on providing control and safety. Being aware of our environment ensures that we are in the correct environment to carry out our tasks.

Identifying the environment is crucial for effective testing of our apps. By knowing we are in the right testing environment, we can experiment and troubleshoot without the fear of affecting the live application or data.

Moreover, it aids in communication within our teams. When everyone is on the same page about the environment they should be working in for specific tasks, collaboration becomes smoother, and we can minimize the chances of errors. The goal is to create a shared understanding and a common approach among team members.


Building The App

Setting the Stage

For our app we will be using a SharePoint List as the data source. Each environment will use its own specific list, so we have 3 different lists that are on different SharePoint sites. Once the lists are created, we can begin building our solution and app.

The first step to creating our Power App that we can easily move between environments is creating a solution to contain our app. In addition to the canvas app the solution will also contain the various other components we require, including a Power Automate workflow and environment variables.

To do this we navigate to our development environment and then select Solutions in the left-hand menu. On the top menu select New solution and provide the solution a name and specify the publisher. For additional details visit this article.

Learn how to create a solution in Power Apps

After creating our solution, we will first create our environment variables that will define the app’s data source. Since the SharePoint site and list will be changing as we progress our app from development to test to production, we will create two environment variables. The first to specify the SharePoint Site, and the second to specify the SharePoint List on the site. For details on environment variables and how they can be modified when importing a solution to another environment visit this article.

Use environment variables to migrate application configuration data in solutions

Here we will manually create the environment variables, so we have control over naming, but there is also the option to automatically create the environment variables from within our app. In the canvas app editor on the top menu select Settings. Within the General section locate the Automatically create environment variables when adding data sources, and toggle to the desired value.

To manually add environment variables to our solution, select New on the top menu, under more we will find Environment variables. Provide the environment variable a name and under Data Type select Data source. In the connector drop down select SharePoint and a valid SharePoint connection in the Connection drop down. For the first variable under Parameter Type select Site and then New site value and select the required SharePoint site or provide the site url. For the second environment variable select List for the Parameter Type, then for the Site select the newly created environment variable, and then New list value, and select the required SharePoint List.

Creating the App in the Development Environment

Our app starts to come to life in our development environment. First, we focus on creating the app’s core features and functionalities. This is where our creativity and technical skills come into play. We can experiment with different designs, workflows, and integrations, all within the safe confines of the development environment. Its a bit like being in a laboratory, where we can test hypotheses and make discoveries without worrying about breaking the version of the app our end user might be actively using.

First, we will connect to our data source using our environment variables. In the left side menu select the data menu, then add new data, and search for SharePoint. After selecting the SharePoint data source and connection, in the Connect to a SharePoint site pane select the Advanced tab and select the environment variable we created previously, and then do the same to select the list environment variable.

If we opted to not create the environment variables first, and ensured the automatically create environment variables when adding data source setting is turned on, we can provide a site URL and select a list. We will then be prompted that an environment variable will be automatically generated to store information about this data source.

Once connected to our data source we will build out the basic functionality of our app. For this simplified app this includes a vertical navigation component and a gallery element to display the list items. Here is the base app that will be our launching point to build a more informative and dynamic app.

Extracting Environment Information

As we deploy our app to different environments, we will update the SharePoint site and list environment variables. Since the values of these environment variables will be distinct and specific to the environment, we can leverage this to help determine and show what environment the app is in.

Now, if we search the data sources that we can add to our app for “environment”, we will find an environment variable values dataverse source. The data source can be used to extract the values of our environment variables however, this will give our app a Premium licenses designation. Premium licensing may not always be suitable or available, so we will explore an alternative method, using a Power Automate workflow and our App.OnStart property.

Building the Power Automate Workflow

In the left side menu, select the Power Automate menu option, then create new workflow.

To extract and return the information we need to our app we will create a simple flow, consisting only of the trigger and the Respond to a PowerApp or flow action. Selecting the Create new flow button will create a Power Automate workflow with a PowerApps (V2) trigger. For this workflow we will not need to add any inputs to this trigger action.

In the workflow designer, select New action and search for Respond to a PowerApp or flow, and add the action to the workflow. Here we will add two outputs, the first to return the value of the SharePoint site environment variable and the second to return the value of the SharePoint list environment variable. Depending on our requirements, we may only need one of these values to determine the appropriate environment information. For the output value we can find our environment variables listed in the dynamic content.

The final workflow is shown below. Once created give the workflow an informative name, then save and close the workflow.

Call the Workflow and Store the Outputs

On the start of our app, we will run our workflow and store the output values, which are the values of our environment variables, in a global variable within our app scope. We do this by using the App.OnStart property and setting a variable to store the outputs. We will add the following to the App.OnStart property.

Set(gblEnvironmentDetails, .Run())

Here, we create the gblEnvironmentDetails global variable which will store the outputs of our workflow. This variable has a record data type with values for both our sourcesiteurl and sourcelistid outputs.

The App.OnStart event, becomes crucial as it sets the stage for the entire app session. Now, each time our app starts are workflow will return the environment values we require ensuring this information is always available from the moment our app is launched.

We can visual these values, and how they change between our environments by adding labels to our app. We will add various environment detail labels. The first we will add will display out SharePoint site environment variable value, set the text property of the label to the following.

"SharePoint Site Environment Variable: " &amp; gblEnvironmentDetails.sourcesiteurl

We will make this value a bit easier to work with and evaluate, by extracting the site name from the site url. We add another label to display the site name, and set the text property of the label to the following.

"SharePoint Site : " &amp; Last(Split(gblEnvironmentDetails.sourcesiteurl, "/sites/")).Value

This expression splits the site url by the text “/sites/” and then returns all the text that follows it which is the site name.

Lastly, we add a text label to display the value stored in our SharePoint List environment variable by adding a new label and setting the text property to the following.

"SharePoint List Id : " &amp; gblEnvironmentDetails.sourcelistid

Adding the Environmental Visual Cues

To make the environment distinction clear we will add environment-specific colors and text labels in our app’s design.

Adding Text Labels

We will start by adding an environment label in the header, that will be placed opposite of our app name. To do this we first create a named formula and then use this to set the text property of the new label in our header element. In the App.Formulas property add the following.

nfmEnvironment = Switch(
    Last(Split(gblEnvironmentDetails.sourcesiteurl, "/sites/")).Value,
    "PowerAppsDevSource", "DEV",
    "PowerAppsTestSource", "TEST",
    "SalesandMarketing", "PROD",
    "UNKNOWN"
);

This expression creates a new named formula nfmEnvironment and we use the switch function to evaluate the site name of our SharePoint site environment variable using the same formula we used above and return our environment label. For our app if our SharePoint site environment variable is for the Power Apps Dev Source site the named formula nfmEnvironment will return a value of DEV, when set to Power Apps Test Source it will return TEST and when set to our Sales and Marketing site it will return PROD. The formula also includes a default value of UNKNKOWN, if none of the above conditions are true, this will help identify a potential error or our app data source set to an unexpected site.

We then add a new label to our header element and set the text property to nfmEnvironment. Additionally, the navigational component used in our app has a text input to display the environment label near the bottom under the user profile image. We will set the input value also to nfmEnvironment.

Environmental Specific Color Themes

Next, we will elevate our awareness when working with our apps across different environments by moving beyond just labels. We will now leverage different visual cues and color themes between the different environments. In our development environment the navigation component and header will be green, when in our testing environment these elements will be gray, and finally in production they will be blue.

The first step to include this functionality is to define our color theme that we can then use to set the color of our different elements depending on the value of nfmEnvironment. To create our color theme, we will create a new named formula. In the App.Formulas property we will add the following to create a named formula containing the basics of a color theme used within our app.

nfmThemeColor =
{
    primary: "#004F6B",
    onPrimary: "#FFFFFF",
    primaryFixed: "#9DC8EB",
    onPrimaryFixed: "#004D67",
    secondary: "#005C3F",
    onSecondary: "#FFFFFF",
    secondaryFixed: "#78CDA7",
    onSecondaryFixed: "#005138",
    tertiary: "#394C57",
    onTertiary: "#FFFFFF",
    tertiaryFixed: "#D0DDE4",
    onTertiaryFixed: "#364954",
    background: "#F6FAFE",
    onBackground: "#171C1F",
    surface: "#F6FAFE",
    onSurface: "#171C1F",
    surfaceContainerLowest: "#FFFFFF",
    surfaceContainerLow: "#F0F4F8",
    surfaceContainer: "#EAEEF2",
    surfaceContainerHigh: "#E5E9ED",
    surfaceContainerHighest: "#DFE3E7"
};

This named formula now stores our different color values and we can use it and our nfmEnvironment formula to dynamically color our apps elements.

We will start with setting the fill of the header. The header is a responsive horizontal container containing our two text labels. The fill property of the container we will set to the following expression.

Switch(
    nfmEnvironment,
    "DEV", ColorValue(nfmThemeColor.secondary),
    "TEST", ColorValue(nfmThemeColor.tertiary),
    "PROD", ColorValue(nfmThemeColor.primary),
    Color.Black
)

Adding the color cues will following a similar pattern that we used to set the environment label text property. We use the Switch function to evaluate our nfmEnvironment value and depending on the value set the color to the secondary color (green), tertiary color (gray), primary color (blue), or if a condition is not met the header will be set to black.

We then use the same expression for the vertical selection indicator bar and next arrow icon in our app’s gallery element. Next we incorporate the same expression pattern to color the different aspects of the navigation element using the expressions below.

//Navigation Background
Switch(
    nfmEnvironment,
    "DEV", ColorValue(nfmThemeColor.secondaryFixed),
    "TEST", ColorValue(nfmThemeColor.tertiaryFixed),
    "PROD", ColorValue(nfmThemeColor.primaryFixed),
    Color.Black
)

//Selected Item Background
Switch(
    nfmEnvironment,
    "DEV", ColorValue(nfmThemeColor.onSecondaryFixed),
    "TEST", ColorValue(nfmThemeColor.onPrimaryFixed),
    "PROD", ColorValue(nfmThemeColor.onTertiaryFixed),
    Color.Black
)

//Base Icon Color
Switch(
    nfmEnvironment,
    "DEV", ColorValue(nfmThemeColor.onSecondaryFixed),
    "TEST", ColorValue(nfmThemeColor.onPrimaryFixed),
    "PROD", ColorValue(nfmThemeColor.onTertiaryFixed),
    Color.Black
)

After adding the dynamic color themes to our navigation our environment aware app is complete.

We now have a clear and informative app that instantly informs users about the app’s current environment. Using text labels and visual cues are simple yet effective ways to avoid confusion and ensure that everyone knows which version of the app they are interacting with.

Deploying to Different Environments

Now that our app is complete, we save and publish our version of the app and begin the process of deploying the app to the testing environment. First, we will edit each environment variables within out solution and remove the current site and current list from our solution. This will help ensure the values we set for these variables in our development environment don’t carry with our solution when we import it to different environments.

Then export the solution and download the exported .zip file. Next, we switch to our test environment, and import the solution. During the import process we are prompted to set our two environment variables, which help set our dynamic and environment specific visual cues in our app. We set the values and finish importing the app to our test environment to view our app in the test environment.

We can then also repeat the process, to see our app in the production environment.

Wrapping Up: Ensuring Clarity and Efficiency in Your Power Apps

As we wrap up our exploration of visually distinguishing environments in Power Apps, remember that the key to a successful app lies in its clarity and user-friendliness. By implement the techniques we have discussed, from color-coding elements of our app and labeling to using dynamic UI elements, we can significantly enhance the user experience. These strategies not only prevent confusion but also streamline our workflow across development, testing, and production environments. When we embrace these tips, we can make our Power Apps intuitive and efficient, ensuring that users always know exactly where they are and what they are working with.


Thank you for reading! Stay curious, and until next time, happy learning.

And, remember, as Albert Einstein once said, “Anyone who has never made a mistake has never tried anything new.” So, don’t be afraid of making mistakes, practice makes perfect. Continuously experiment, explore, and challenge yourself with real-world scenarios.

If this sparked your curiosity, keep that spark alive and check back frequently. Better yet, be sure not to miss a post by subscribing! With each new post comes an opportunity to learn something new.

Power Apps Dynamic Design: Explore Dynamic UI Strategies


Setting the Stage for Dynamic Interfaces

If you are new to the world of Power Apps, it is where we blend our creativity with technology to build some seriously powerful and helpful applications. In this particular exploration we will be diving into an inventory management application for Dusty Bottle Brewery.

Our focus? Dynamic user interfaces (UI). It is all about making an app that is not only functional but also engaging and intuitive. Imagine an inventory app that adapts in real-time, showcasing inventory updates, new arrivals, and even alerts when a popular brew or item is running low. That is the power of dynamic UI in action, it makes our app come alive.

Join me as we explore Power Apps and learn how to transform a standard inventory management application into an interactive and responsive tool. We will dive into leveraging visible properties, integrating role-based elements, and much more. Whether you are an expert or just starting, come along on this exciting journey to create a dynamic and vibrant app.


The Magic of Visible: More Than Meets the Eye

The Visible property in Power Apps is crucial for creating a dynamic app at Dusty Bottle Brewery and forms the cornerstone of creating an engaging user experience. Using this property effectively is focused on displaying the right information at the right time for a sleek yet informative interface.

Here’s how it works in action: when we open our Inventory App, we are brought to a dashboard showing current stock levels. This main dashboard uses the visible property of various elements to dynamically show additional information for each item.

For example, each item shows a stock status badge indicating if the stock level is good, average, low, or extremely low. This is all made possible leveraging the visible property of these objects. It’s more than just hiding and showing object, we are creating a responsive experience that adapts to user interactions.

Let’s dive into the information (i) icon and the details it has to offer. By selecting the i icon for a product, we reveal additional information like the recommended order amount, cost per unit, and total cost for the recommended order.

Time to see how it works with some practical expressions. Below is the main dashboard. Notice how the information (i) icon appears on the selected item. This is accomplished by setting the visible property of the icon to ThisItem.IsSelected.

Additionally, by selecting this icon the user can display additional information. This information provides just in time insights. Providing for a responsive experience that displays all the required information at just the right time leaving a clean and simple dashboard with hidden power that is revealed through user interactions.

We use a variable to set the Visible property of the informational items. For the informational icons OnSelect property we use:

UpdateContext({locInfoVisible:!locInfoVisible});

The locInfoVisible variable toggles between true and false, acting as a switch. The pattern of using ! (i.e. not) and a boolean variable is helpful for flipping the variable’s value between true and false.

We are not limited to boolean variables to control our app objects visibility. Any expression that evaluates to true or false will work. An example of this within our app is the stock status badges. Each icon has its own specific condition controlling its visibility.

For each product we calculate the percentage of our target stock count. In the app we store this value in the text label lbl_Main_StockEval.

For example, the Extremely Low icon’s visible property is set to

Value(lbl_Main_StockEval.Text)&lt;=20

This results in the icon showing only when the expression evaluates to true, that is if the item stock is less than or equal to 20% of the target amount.

Effectively pairing expressions with the visible property streamlines our app’s interface, focusing attention on what is most relevant. This elevates our apps from functional to intuitive and powerful.


User Roles and UI Elements: A Match Made in Heaven

Customizing apps based on user roles is crucial for any organization. Although this type of customizing includes things such as access control, it can go way beyond just that. Customizing our apps for different user roles is focused on making our apps more intuitive and user-friendly while recognizing what that means may differ for each individual or for each user role.

Let’s, examine a scenario with our Dusty Bottle Brewery inventory app where personnel should see a simplified dashboard focused on just their area of responsibility. Staff in the Brewing department should only see brewery related inventory, staff in the Sales and Marketing should only see merchandise related inventory, while staff in Logistics and Supply Chain should be able to view all items. This is where the flexibility of Power Apps shines, allowing us to tailor our apps based on the current user.

We first need to add the Office 365 Users data connector which then allows us to set UserProfile to the current user’s profile. In the Formulas property of the App object we add the following Named Formula:

UserProfile = Office365Users.MyProfileV2();

Note: This can also be done with a global variable by adding the following to the OnStart property of the App object.

Set(gblUserProfile, Office365Users.MyProfileV2());

The user profile provides the required information to personalize the user experience for our app. For example, we use UserProfile to welcome the current user in the top right of the app.

Next, we use the user’s department to control the data presented on the dashboard, ensuring relevant information is highlighted.

To add this role-based feature we add the following to the App OnStart property to pre-load the appropriate data.

Switch(
    true,
    UserProfile.department = "Brewing",
    ClearCollect(
        colSpInventory,
        Filter(
            Inventory,
            Category.Value = "Beer"
        )
    ),
    UserProfile.department = "Sales and Marketing",
    ClearCollect(
        colSpInventory,
        Filter(
            Inventory,
            Category.Value = "Merchandise"
        )
    ),
    UserProfile.department = "Logistics and Supply Chain",
    ClearCollect(
        colSpInventory,
        Inventory
    )
);

Here we filter the collection of inventory items (colSpInventory) based on the user’s department. This collection is then used in the Items property of the gallery displaying the inventory items. This approach enhances the efficiency and reducing clutter within our app.

For instance, Dusty Bottle’s Lead Brewer, Adele Vance, sees only brewery items, streamlining her experience. This helps Adele identify brewery items that are low in stock and provides all the information she requires without cluttering the dashboard with irrelevant information.

What is the most exciting about this level of control is the possibilities of the personalization aspect.

For example, let’s build on this role-based feature by expanding it beyond the user’s department. Dusty Bottle Brewery has a management team containing members of all departments and the members of this group should be able to see all inventory items. This group of users is defined by a Microsoft 365 group, and we will leverage the group’s membership to add this functionality to our app.

First, we add the Office 365 Group data connector to our app. Similar to Office 365 Users, this allows us to use Office365Group.ListGroupMembers to get all the members of our Management group.

Then we add another Named Formula to the Formulas property of the App.

ManagementMember = !IsBlank(
    LookUp(
        Office365Groups.ListGroupMembers("&lt;group_object_id&quot;).value,
        displayName = UserProfile.displayName
    )
);

Let’s break this down, starting from the inside working out. We provide Office365Groups.ListGroupMembers the object id of the required group, this then provides a record. The record property value contains the membership user information we are looking for. We then use LookUp to see if the current user’s display name is within the group members. If the returned record from LookUp is not (!) blank, then the user is a member of the management group, and ManagementMember returns a value of true, otherwise false.

Finally, we update the OnStart property of our app to the following.

Switch(
    true,
    UserProfile.department = &quot;Brewing&quot;,
    ClearCollect(
        colSpInventory,
        Filter(
            Inventory,
            Category.Value = &quot;Beer&quot;
        )
    ),
    UserProfile.department = &quot;Sales and Marketing&quot;,
    ClearCollect(
        colSpInventory,
        Filter(
            Inventory,
            Category.Value = &quot;Merchandise&quot;
        )
    ),
    ManagementMember || UserProfile.department = &quot;Logistics and Supply Chain&quot;,
    ClearCollect(
        colSpInventory,
        Inventory
    )
);

Providing each user or group a tailored interface that feels like it is made just for them. Using these role-based approaches we can deliver the right tools and information to the right people at the right time.


Input-Driven Interfaces: Reacting in Real-Time

In the dynamic environment of any organization, an input-driven interface can significantly improve the user experience by responding to user actions in real-time. This approach makes the app both intuitive and interactive.

For example, updating inventory involves selecting an item from the main dashboard to access its restocking screen. On the restocking screen the user is provided all the essential information for restocking an item.

This screen shows the cost, stock status indicator, stock count, and the target stock count on the left. On the right, is a dynamic input control and what the stock indicator would be if the input quantity is restocked. The default of this control is the difference between the current stock and the target stock value.

The input-driven interface updates information based on user input, ensuring accuracy and responsiveness. For instance, changing the restock quantity automatically updates the related information (e.g. Restock Total Cost).

What if the user is only able to restock 10 of these baseball caps. After updating the Restock Quantity input, we see the change reflected in the Restock Total Cost.

We achieve this by referencing the restock quantity (txt_Restock_QuantityAdded) in the text label displaying the total cost and the visible property fields of the stock indicator badges. The total cost label’s text property is set to the following.

Text(
    Value(txt_Restock_QuantyAdded.Text * gblSelectedItem.Cost),
    "$#,##0.00"
)

But the possibilities don’t have to end there. The app could integrate sliders or dropdown menus for inventory updates. As the user adjusts these controls, the interface could dynamically show the impact of these changes.

This approach can be extended to handle complex scenarios, like entering a new item, where the app reveals additional fields based on the item category or other properties. This can help keep the interface clean while also guiding the user through data entry in a logical, step-by-step manner.

Harnessing the power of input-driven interfaces transforms our apps into responsive companions, adapting to user needs and simplifying tasks.


Buttons and Actions: Bringing Our Interfaces to Life

Interactive buttons and actions play a pivotal role in bringing the user interface to life. They create engaging and interactive experiences for our users.

Consider our simple action of updating stock levels in our inventory app. Selecting the Restock button updates the stock value and, if successful, presents a success message to the user. This immediate feedback reassures users and enhances their interaction with the app.

Additionally, we can tailor buttons and actions for different user roles. For example, enabling the Restock button only for management staff. Using the ManagementMember named formula created previously, we set the DisplayMode of the Restock button to the following.

If(ManagementMember, DisplayMode.Edit, DisplayMode.Disabled)

By thoughtfully integrating these elements, we turn mundane tasks into engaging interactions, making our apps an integral part of the daily workflow.


Tying It All Together: Crafting a Seamless Navigation Menu

As our apps grow in complexity and expand, easy navigation becomes crucial. A well-crafted navigation menu integrates all the dynamic UI features we have discussed into one cohesive, user-friendly package.

First, the navigation menu’s visibility is a key aspect and is controlled by the Visible property. We can make the navigation menu appear and disappear with a simple button click. This approach keeps the interface clean and uncluttered, allowing users to access the menu when needed and hide it when focusing on other tasks. We us a hamburger menu icon to launch the menu when selected using the following for its OnSelect property.

UpdateContext({locNavigationVisible: true})

Additionally, we will set the Visible property of the hamburger icon to !locNavigationVisible. This will hide the icon after it is selected allowing us to show a cancel icon that when selected will hide the navigation menu. The Cancel icon’s OnSelect property is set to the following.

UpdateContext({locNavigationVisible: false})

While its Visible property is set to locNavigationVisible.

Next, we enrich the navigation with selectable icons and actions that allow users to effortlessly navigate between the different screens of our app. Each icon in the navigation menu is linked to a different screen in the app. Using the Power Apps Navigate function and the OnSelect property of the icons seamlessly transports the users to the desired screen, enhancing the app’s overall usability and flow.

Lastly, we tailor the navigation experience to different user roles. For instance, links to admin-specific screens. Above, we can see the navigation menu includes a button to navigate to the Admin screen. This screen should only be accessible to staff within the Logistics and Supply Chain department. To do this we add the following named formula to our App’s Formulas property.

AdminUser = UserProfile.department = "Logistics and Supply Chain"

We can then set the Visible property of the Admin button within the navigation menu to AdminUser. This will make this navigation button visible if the current user is within the Logistics and Supply Chain department and hide this option for all other staff.

Now, we can see that the Admin navigation icon is visible to Grady, who is within the Logistics and Supply Chain department.

However, when Adele uses this app, who is not in this department, the navigation icon is not shown.

By integrating these elements, the Inventory Management app’s navigation becomes a central hub that intelligently adapts to user needs and roles.


Wrapping Up: The Future of Dynamic UI in Power Apps

As we wrap up our journey through Dusty Bottle Brewer’s Inventory App, it is clear that the future of dynamic UI in Power Apps is here and now. Harnessing the power of features like the Visible property, role-based UI elements, input-driven interfaces, and more, we have seen how an app can transform from a simple tool into an essential part of the organizational ecosystem.

The power of Power Apps lies in its ability to continuously evolve allowing us to iterate on our apps, enhancing their responsiveness and efficiency. This inventory app showcases how technology meets business needs and enhances user experiences.

As we build upon our apps the possibilities are varied and exciting. We can incorporate more advanced integrations, AI-driven functionalities, and even more user-friendly designs. The goal will always remain the same: to create applications that are not just functional, but intuitive, responsive, and easy to use.

Here’s to the future of dynamic UI in Power Apps – a future where technology meets user needs in the most seamless and engaging ways possible. Cheers to that!


Thank you for reading! Stay curious, and until next time, happy learning.

And, remember, as Albert Einstein once said, “Anyone who has never made a mistake has never tried anything new.” So, don’t be afraid of making mistakes, practice makes perfect. Continuously experiment, explore, and challenge yourself with real-world scenarios.

If this sparked your curiosity, keep that spark alive and check back frequently. Better yet, be sure not to miss a post by subscribing! With each new post comes an opportunity to learn something new.