Chart your data journey! Transform data into insights with Power BI core visualizations.
Table and Matrix visuals in Power BI are essential for presenting detailed and structured data. Both visuals excel at displaying large amounts of information while highlighting trends, relationships, and hierarchies.
Tables offer a simple way to present data in a straightforward tabular format and are best for displaying detailed row-level data, such as sales records, inventory lists, or customer information. Unlike other visuals that summarize data at a high level, tables retain all details, making them an excellent tool for deep-dive analysis.
Matrix visuals enhance this capability by grouping and summarizing data hierarchically. Unlike tables that present data in a flat structure, matrix visuals allow for expandable rows. Users can then collapse or expand these groupings interactively to meet their needs.
Table and Matrix visuals are excellent for presenting data and hierarchical summaries, but they may not be suitable for every situation. It’s important to choose the right visual for effective reporting. To discover other essential visuals, check out Parts #1, #2, and #3 of the Explore Power BI Core Visualizations series.

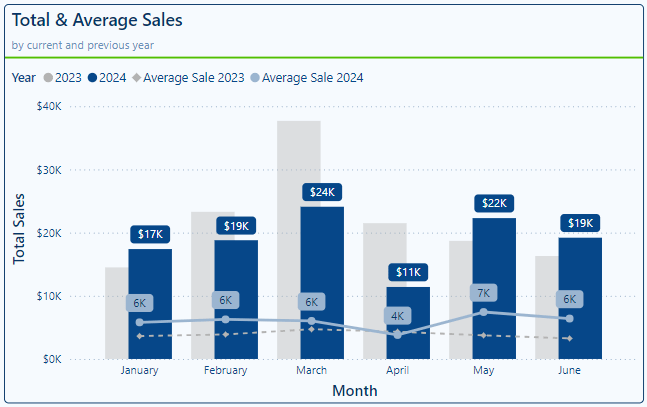
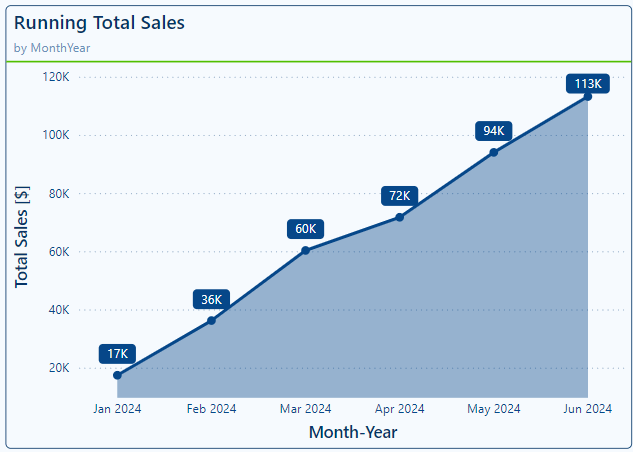
Explore Power BI Core Visualizations: Part 1 – Bar and Column Charts
Chart your data journey! Transform data into insights with Power BI core visualizations.

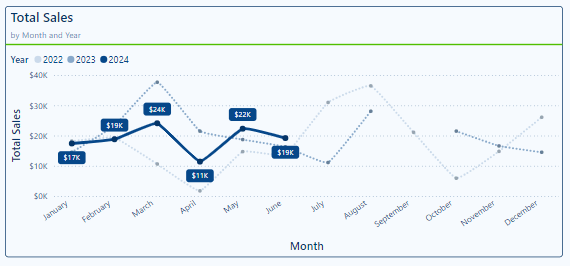
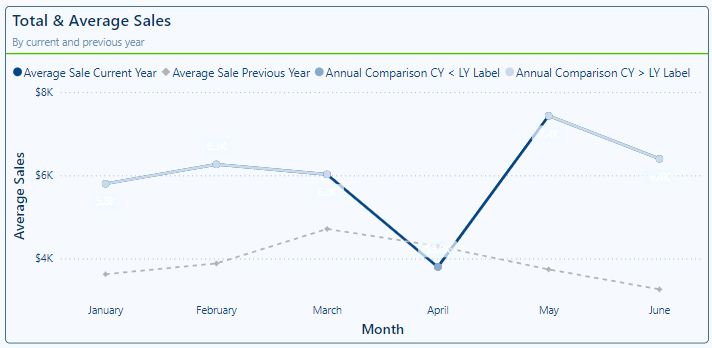
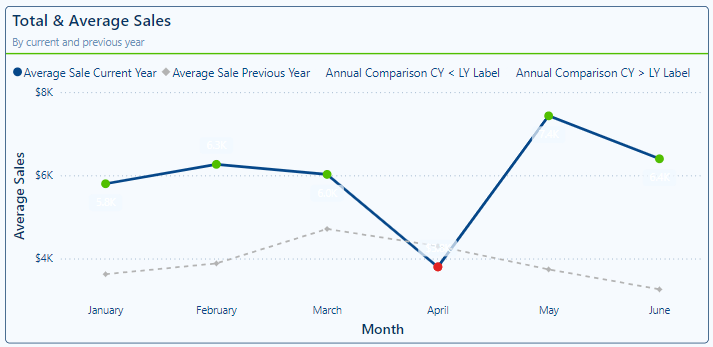
Explore Power BI Core Visualizations: Part 2 – Line and Area Charts
Chart your data journey! Transform data into insights with Power BI core visualizations.

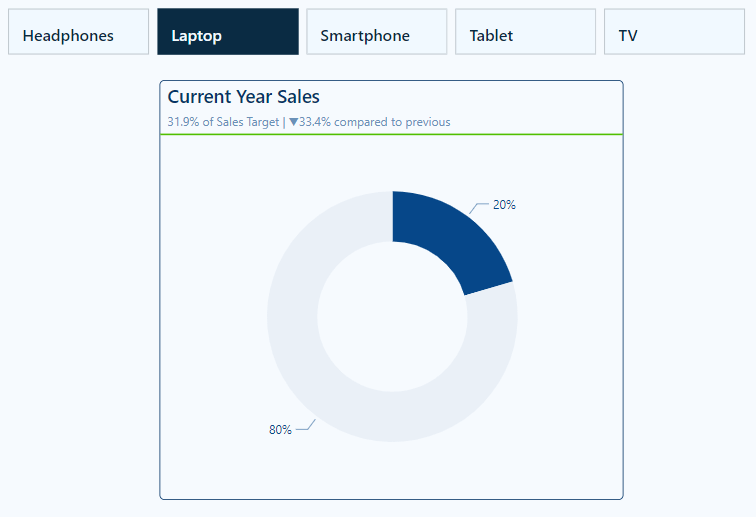
Explore Power BI Core Visualizations: Part 3 – Pie, Donut, and Treemap
Chart your data journey! Transform data into insights with Power BI core visualizations.
Customizing Table Visuals
Table visuals in Power BI can be challenging to read and may become overwhelming if not formatted properly. Power BI offers a range of properties that allow us to customize our table visuals, enhancing readability, improving structure, and dynamically highlighting key insights.
Formatting the Table Layout
The fundamentals of formatting our table visuals involve customizing the grid, values, column headers, and totals properties. By adjusting these elements, we can enhance the appearance and clarity of our table visuals, making them more readable for our viewers.

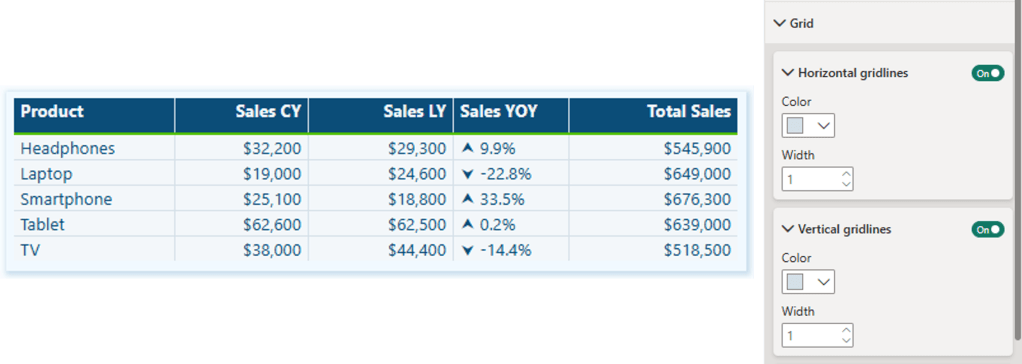
The grid properties of our table visuals dictate how rows and columns are separated, providing a structured appearance.
We can toggle the horizontal and vertical gridlines on or off based on the requirements of the visual and the desired level of separation between rows and columns. Enabling the gridlines results in a structured layout, while disabling them offers a more minimalist design.
Additionally, the borders property allows us to define and apply borders to various sections of the table visual, including the column header, values section, and totals section.
In this example, we enable both the horizontal and vertical gridlines and set the bottom border of the column header section to an accent green color.
Next, we will focus on the Values property section. This area allows us to customize text styles and background colors, essential for ensuring our tables are readable and visually engaging.
We can specify the primary text color, background color, and alternate colors to differentiate between alternating rows in the visual. Alternating the styles of the rows improves readability and makes it easier to track values across each row.

The final basic formatting properties to consider are the column headers and totals. The column header properties allow us to adjust the font size, background color, and text alignment, which helps create a structured and easy-to-read table.
When we enable the Totals property, our table will include a row that aggregates the values from each column. We can customize this row’s font style, text color, and background color to distinguish it from the standard data rows.
In our example, we set the column headers to white with a dark blue background, making the header row easily identifiable. Additionally, we activate the totals row, giving it dark blue text, a gray background, and top and bottom borders to further differentiate it from the other data rows.

Enhancing Tables with Advanced and Conditional Formatting
In addition to basic formatting, Power BI provides multiple settings and options for advanced and conditional formatting, allowing for greater control over the appearance of table visuals. These options enable targeted formatting for specific columns and dynamic styling for key data points and trends.
We can utilize the specific column properties to apply unique formatting to individual columns, offering the flexibility to adjust the styling of headers, values, and total values for different series.
For example, we can include the count of transactions alongside our sales data in the table. Using the specific column properties, we can set the text color of the values and totals to visually distinguish them from the primary focus of the sales amounts.

The cell elements properties offer additional customization options and enable dynamic formatting. These customizations enhance our ability to highlight trends and identify key values.
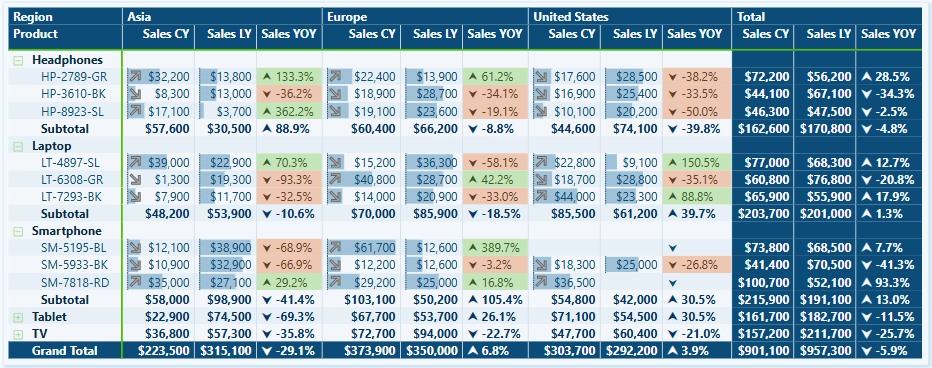
For instance, using these properties, we can conditionally format the background and text color of the Sales Year-over-Year (YoY) series. This lets us quickly see which products have experienced growth or decline compared to the previous year.
We enable data bars for the current and last year’s sales series, visually comparing sales values across different products.
We also activate the icons feature for the current year’s sales values. We add a trending upward arrow for products whose current-year sales exceed those of the previous year and a downward arrow for products whose current-year sales are lower than last year’s. This visual representation quickly indicates product sales growth next to each product category and complements the Sales Year-over-Year series.

By integrating fundamental concepts, specific column formatting, cell elements, and conditional formatting, our Power BI table visuals can become dynamic and intuitive report elements that lead users to insights.
Customize Matrix Visuals
The Matrix visual in Power BI shares many of the same formatting options as the Table visual, including Grid, Values, Column headers, Specific column, and Cell elements formatting. However, Matrix visuals introduce additional formatting options for the hierarchical data structure.
Row Headers
Row headers are a key feature of Matrix visuals, allowing viewers to group and drill into the data. Power BI lets us define the font styling, text alignment, text color, and background color. We can also customize the size and color of the expand and collapse (+/-) buttons, or not show them all together.

Subtotals and Grand Totals
Row subtotals summarize data at each hierarchical level, allowing viewers to see how individual categories contribute to the overall total.
By toggling a setting in the Format options, we can enable or disable row subtotals. When row subtotals are enabled, we can customize the font and background styling and define the total label and its position.
In our example, we enable row subtitles and adjust the styling to ensure consistency with other visual elements. We then set the position of the subtotal to the bottom and activate the row-level settings. Under these settings, we select Product Code and label it as “Subtotal.” Next, we choose Product and label it “Grand Total.”

Grand totals display the final sum of all row and column values in our Matrix visuals. Proper formatting ensures these totals remain distinct and easy to locate.
The formatting options include font styling, font color, and background color.
Advanced Techniques and Customizations
The table and matrix visuals in Power BI provide a range of options for creating unique presentations that enhance data visualization, interactivity, and analytical depth. By designing these visuals thoughtfully, we can highlight key insights, delve deeper into our data, and create dynamic reports tailored to the viewers’ needs. Let’s explore some advanced examples that go beyond the basics.
Clean and Straightforward Sales Totals
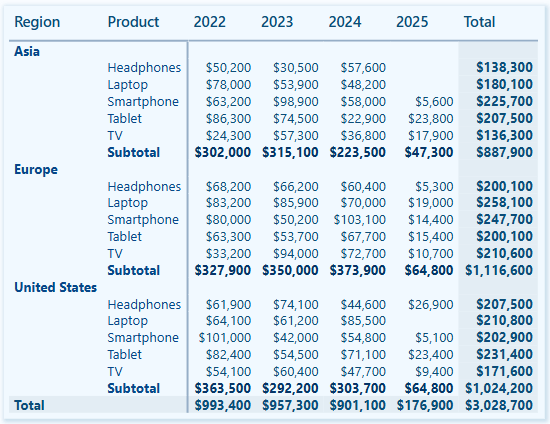
This matrix visual presents a structured overview of our sales totals across different regions, product categories, and years. The clear and straightforward presentation makes analyzing trends over time and across regions easy.

We add a matrix visual to our report canvas to create this visual. Next, we place the Region and Product data into the Rows field, the Year into the Columns field, and a Total Sales measure into the Values field. After that, we expand all rows by one level and position the row subtotals at the bottom. Finally, we change the label for the Product row level label to Subtotal.

In the Layouts and Style Presets options, we set the Style to “None” and the Layout to “Outline.” We also toggled off the Repeat Row Headers option.
Under the Values properties, we adjust the background color and alternate background color to match the color of the matrix background.

Next, we format our column headers and the grand total section.
Column Headers:
- Background color: matrix background color
- Font color: dark blue font color
- Font style: semi-bold and font size 11
Row/Column Grand Total:
- Background color: a darker tone of the matrix background color
- Font color: the same dark blue used for the values
To complete the visual, under the Cell elements properties, we enable data bars and set the positive bar color to a tone of the matrix background, ensuring that the bars and values are easy to read.

Month and Day of Week Sales Heat Map
We can use the Power BI matrix visual to create a heat map that visually displays sales performance across different days of the week and months. This heat map is created using the conditional formatting feature for cell elements, effectively highlighting patterns in our sales distribution.

We place a month name series in the rows field, a weekday name abbreviation series in the columns field, and a total sales measure in the values field.
Then, we toggle off the row and column subtotals.

To create a heat map, we start by enabling the background color property under the Cell elements section.
In the Background Color dialog box, we set the Format Style to gradient based on our Total Sales measure. Next, we add a middle color and set the colors for both the minimum and center values to match the matrix background, while the color for the maximum value is set to a dark blue. Including a middle color helps emphasize the top performances in the heat map.
Next, we enable the font color property under Cell elements.
In the Font Color dialog box, we set the Format Style to gradient based on our Total Sales measure. We then add a middle color and set both the minimum and maximum values to match the background color of the matrix. For the center value, we select a slightly darker shade. By setting these colors, we can hide values close to the minimum, gradually reveal values as they approach the maximum, and ensure that the light color of the maximum stands out against the dark blue background.

Product Review Ratings with Custom SVG Icons
This matrix visual uses custom SVG icons to show average product ratings by region, product, and product code.

We start by adding the Product and Product Code columns to the Rows fields, the Region column to the Columns field, three measures to the Values fields, and applying general formatting to the column headers.

The measures are:
Score SVG =
VAR prefix = MAXX(FILTER(Icons, Icons[Name]="prefix"), Icons[SVGIcon])
VAR _00 = MAXX(FILTER(Icons, Icons[Name]="Satisfaction0.0"), Icons[SVGIcon])
VAR _05 = MAXX(FILTER(Icons, Icons[Name]="Satisfaction0.5"), Icons[SVGIcon])
VAR _10= MAXX(FILTER(Icons, Icons[Name]="Satisfaction1.0"), Icons[SVGIcon])
VAR _15= MAXX(FILTER(Icons, Icons[Name]="Satisfaction1.5"), Icons[SVGIcon])
VAR _20= MAXX(FILTER(Icons, Icons[Name]="Satisfaction2.0"), Icons[SVGIcon])
VAR _25= MAXX(FILTER(Icons, Icons[Name]="Satisfaction2.5"), Icons[SVGIcon])
VAR _30= MAXX(FILTER(Icons, Icons[Name]="Satisfaction3.0"), Icons[SVGIcon])
VAR _35= MAXX(FILTER(Icons, Icons[Name]="Satisfaction3.5"), Icons[SVGIcon])
VAR _40= MAXX(FILTER(Icons, Icons[Name]="Satisfaction4.0"), Icons[SVGIcon])
VAR _45= MAXX(FILTER(Icons, Icons[Name]="Satisfaction4.5"), Icons[SVGIcon])
VAR _50= MAXX(FILTER(Icons, Icons[Name]="Satisfaction5.0"), Icons[SVGIcon])

RETURN
SWITCH(
    TRUE(),
    [Average Score]<0.5, prefix&_00,
    [Average Score]>=0.5 && [Average Score]<1.0, prefix&_05,
    [Average Score]>=1.0 && [Average Score]<1.5, prefix&_10,
    [Average Score]>=1.5 && [Average Score]<2.0, prefix&_15,
    [Average Score]>=2.0 && [Average Score]<2.5, prefix&_20,
    [Average Score]>=2.5 && [Average Score]<3.0, prefix&_25,
    [Average Score]>=3.0 && [Average Score]<3.5, prefix&_30,
    [Average Score]>=3.5 && [Average Score]<4.0, prefix&_35,
    [Average Score]>=4.0 && [Average Score]<4.5, prefix&_40,
    [Average Score]>=4.5 && [Average Score]<=5.0, prefix&_50
)
Average Score =
AVERAGE(Reviews[SatisfactionScore])Review Count =
COALESCE(COUNTROWS(Reviews), 0)We enable column and row subtotals and format the grand totals section to visually distinguish it from the main data.

This visual enhances the user experience by making the review score data more intuitive to explore and understand.
These examples demonstrate how Power BI’s Table and Matrix visuals can be used and customized to improve our reports. By leveraging these visuals and the customization options they offer, we can create engaging, insightful, and easy-to-interpret reports.
Wrapping Up
Table and Matrix visuals in Power BI are effective tools for presenting structured data, whether through detailed tables or hierarchical matrices. By applying formatting and customization techniques, these visuals can transform our data and provide clear and intuitive insights.
Advanced features such as drill-down capabilities, cell element customization, and conditional formatting enhance these visuals beyond merely presenting numbers, making them more interactive and visually engaging. Table and Matrix visuals offer the flexibility to meet a variety of our reporting needs.
If you’d like to follow along and practice these techniques, sample data, and a Power BI report template file are available here: GitHub – EMGuyant Power BI Core Visuals.
Thank you for reading! Stay curious, and until next time, happy learning.

And, remember, as Albert Einstein once said, “Anyone who has never made a mistake has never tried anything new.” So, don’t be afraid of making mistakes, practice makes perfect. Continuously experiment, explore, and challenge yourself with real-world scenarios.
If this sparked your curiosity, keep that spark alive and check back frequently. Better yet, be sure not to miss a post by subscribing! With each new post comes an opportunity to learn something new.