Learn how to trigger Power BI dataset refreshes automatically using Power Automate when new files are added to SharePoint.
We have created a Power BI report that connects to a SharePoint folder where our team uploads new files every month. The process is simple: upload the file, refresh the report to incorporate the latest data, and then view the updated report.
But our users view the report, and then the messages begin “Is the report updated yet?” “Do I need to refresh it?
Manual refreshes could work, but it can also be challenging to manage and they are often overlooked. Scheduled refreshes present another option. However, they may not always be suitable. These refreshes occur on a fixed schedule, regardless of whether the data has changed. As a result, we may refresh too early and miss the new file, or we may refresh too late, leading users to view outdated information.
This post will explore an event-driven approach that aligns our report updates with the addition of new files.
With Power Automate, we can automatically trigger a dataset refresh when (and only when) a new file is added to our SharePoint source. This event-based refresh ensures our reports remain in sync with our data.
The Workflow
The Scenario
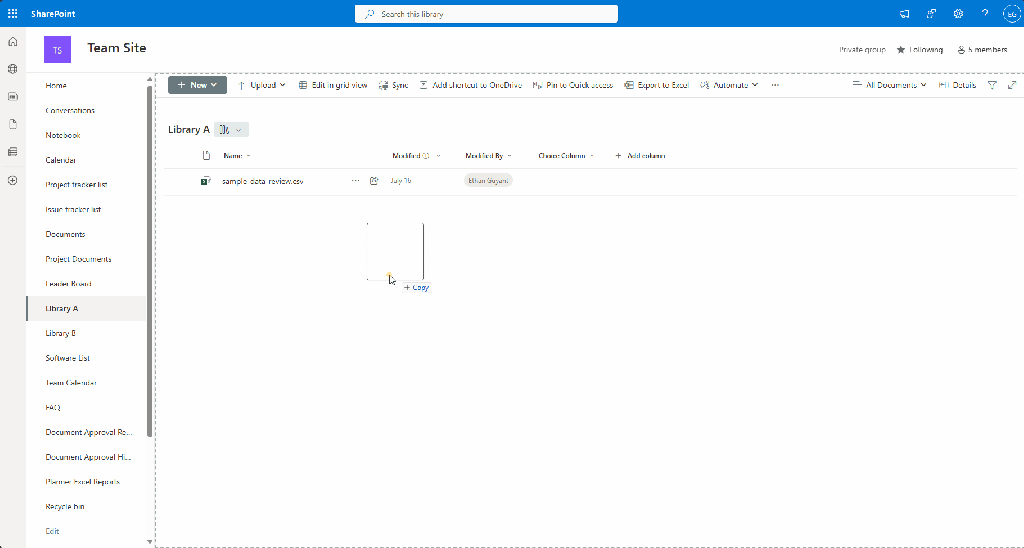
Let’s say we maintain a Power BI report that tracks product reviews. Each month, a CSV file is delivered, which the product team uploads to SharePoint. Once the file is uploaded, it is appended to our Power BI dataset, incorporating the reviews from the previous month.
The delivery and upload of files are manual processes that occur on the first weekday of each month. We could schedule the report refresh, but we need to determine the best frequency. Should we refresh it daily? If we do, we might refresh the report 30 times in a month without any new data. Alternatively, if we choose a weekly refresh, users may have to wait longer to access the latest information.
We will use Power Automate to monitor the SharePoint document library. By utilizing the When a new file is created trigger, the workflow starts automatically whenever a new file is added. This process refreshes the dataset and can even send a notification with a link to the updated report once it’s complete.
Build the Flow
The workflow is divided into three main sections: the trigger, refresh, and notification.
Trigger & Setup
We start with the When a file is created (properties only) SharePoint trigger, configured to the site and library where our file is uploaded. If necessary, we can utilize trigger conditions to prevent unnecessary refreshes.
The workflow uses two variables to verify that the refresh has completed before notifying users.
LastRefreshTime: tracks the current timestamp of the last dataset refresh.
RefreshRequestTime: stores the timestamp at which the flow starts the refresh.
Refresh the Dataset
We then use the Refresh a dataset Power BI action to trigger the report update. This action targets the specified workspace and dataset.
Note: the Power BI dataset includes a reference table called Last Refresh DateTime , which stores the timestamp (DateTimeZone.utcNow()) for when the dataset was last refreshed.
After initiating the refresh, we add a Do until loop that waits for the refresh to complete. The loop actions include:
Delay 30 seconds between checking the LastRefreshTime
Execute a query against the dataset to retrieve the Last Refresh DateTime value (DAX Query: EVALUATE Last Refresh DateTime)
Update the LastRefreshTim variable.
The loop repeats until the LastRefreshTime value is greater than the RefreshRequestTime.
Notify Users
After the refresh is complete, the workflow sends a confirmation email using the Send an email action. This email can be directed to the report owners or a shared inbox to confirm that the data is up to date. It can even include a link for users to view the report.
Tips for a More Reliable Setup
Here are some tips to enhance the reliability of our refresh automation.
Structure files consistently
Maintaining a consistent naming convention for files used in our automation reduces confusion and provides options for additional filtering within the workflow. It also simplifies our Power Query transformations.
Add retry logic and error handling
Delays and errors are inevitable, so it’s important to plan for them in advance. Incorporate branching or error-handling logic to notify the appropriate individuals when issues arise. For guidance on creating a dynamic failure notification system, see Elevate Power Automate Error Handling with Centralized Failure Notifications.
Keep the refresh lightweight
Avoid complex refresh dependencies. Preprocess large files or utilize staging tables to maintain the responsiveness and efficiency of our Power BI model.
Test with testing files first
Before automating production reports, upload sample files and verify the entire process to ensure accuracy. Confirm that the refresh timestamp updates correctly and that notifications are received as expected.
Try This Next
After automating our refresh process, the next step is to clean and shape the incoming data in a consistent and repeatable manner. Power Query parameters and functions simplify this task, enabling us to reuse common logic across different files. For instance, we can easily set data types, remove duplicates, and format text fields.
Manually refreshing datasets is only effective for a small number of reports serving a limited team. As our data expands and more users depend on timely insights, automation becomes crucial.
Scheduled refreshes are beneficial when new data arrives consistently or continuously. However, if our report data does not fit this scenario, scheduled refreshes will still run even if there are no updates to the data.
Our event-driven approach effectively addresses this scenario. Instead of estimating when to schedule updates, we implement a strategy that responds in real-time. By integrating SharePoint Online, Power BI, and Power Automate, we can create reliable and straightforward workflows that ensure our reports remain up-to-date and accurate.
Thank you for reading! Stay curious, and until next time, happy learning.
And, remember, as Albert Einstein once said, “Anyone who has never made a mistake has never tried anything new.” So, don’t be afraid of making mistakes, practice makes perfect. Continuously experiment, explore, and challenge yourself with real-world scenarios.
If this sparked your curiosity, keep that spark alive and check back frequently. Better yet, be sure not to miss a post by subscribing! With each new post comes an opportunity to learn something new.
Discover how to personalize your reports and show each user only the data they require in just a few clicks.
When creating reports for teams across various departments or regions, it’s important to recognize that not everyone needs or wants to see the same data. This is where Row-Level Security (RLS) becomes essential.
We can use RLS to restrict data access for report viewers based on their identity. This eliminates the need to create separate reports for different departments or regions. With RLS, we can use a single report and dataset to generate personalized views for each individual or role.
In this guide, we will walk through:
What RLS is and why we should use it
Static vs Dynamic RLS
Step-by-step examples for each
Limitations and Considerations when implementing RLS
By the end of this guide, you will better understand RLS, its applications, and its limitations. Additionally, a PBIX example file will be provided for in-depth, hands-on exploration of this topic.
What is Row-Level Security
Row-level Security (RLS) within Power BI restricts data access for report viewers based on their identity by enabling us to establish rules within our data model to filter data rows.
Consider it as always adding another filter to the appropriate users. These filters are applied at the dataset level, ensuring that users can only see the information they can access, regardless of how they interact with the report
It is important to note that users who have more than viewer permissions to the Power BI workspace have access to the entire semantic model. RLS only restricts data access for users with Viewer permissions.
Why use Row-Level Security
There are several key advantages to using Row-Level Security (RLS) when creating our reports.
Security and Privacy
RLS helps prevent users from seeing data they shouldn’t have access to. This can become especially important when the dataset includes sensitive data.
Efficiency and Scalability
Managing separate reports for different departments or roles can be cumbersome. With RLS, we can create and customize one report for each user role. This approach is easier to maintain, scales better, and reduces the likelihood of inconsistencies and errors.
Improved User Experience
Users no longer need to apply slicers or filters to view only their data of interest. RLS automatically handles this when the report is rendered, resulting in a cleaner and more user-friendly report.
Static Row-Level Security
Static Row-Level Security (RLS) is the most straightforward form of RLS. In this approach, we manually define which users can access specific rows of data, usually by applying filters based on criteria such as Region or Department. This method works well when there is a small group of users and the access rules do not change frequently.
Step-by-Step: Static RLS
Static RLS applies a fixed value in the DAX filter when rendering our report. Configuring static RLS involves several steps.
1. Creating RLS roles in Power BI Desktop To create RLS roles in Power BI Desktop, navigate to the Modeling tab and select Manage Roles.
Then, we select + New under Roles on the manage security roles dialog box. For this sample report, we create a role for each sales region.
We give each role a descriptive name, select the table to which the filter is applied, and create the filter condition.
After each role is created, any user we assign to the Asia, Europe, or United States role will only see data filtered to that specific region.
This approach is considered Static RLS since we use a static value to define each role.
2. Testing the roles in Power BI Desktop Within Power BI Desktop, we can test each role to validate it by selecting the View as option on the modeling tab.
After selecting a role, we can see the report rendered as if we are a member of that role.
3. Deploying the report to the Power BI Service Once we create and validate the roles, we publish the report to the Power BI Service as with any other report.
4. Add members to the role in the Power BI Service To add a member to the role in the Power BI Service, we must navigate to the workspace where we published the report. We locate the semantic model and select the More options ellipsis (…) and then Security.
Within the Row-Level Security screen, we add users or security groups to each role we created. RLS rules will not apply to users who have access to the report but have not been added to a role.
5. Testing the roles in the Power BI Service On the Security screen, we select the More options ellipsis (…) next to each role and then Test as role.
Once all roles have been validated, we have successfully implemented static row-level Security in Power BI.
Dynamic Row-Level Security
While static RLS can be great for smaller teams, it doesn’t scale well. Manually assigning roles to individuals quickly becomes unmanageable.
Dynamic RLS solves this issue using a User Access Table or a field that defines each user’s role inside our data model. The report utilizes this table to filter itself based on who is viewing the report.
For this example, our data model has an Employee table that contains each employee’s user principal name and role (e.g., Asia Sales, Europe Sales, US Sales, Management, or blank). We utilize this information to implement dynamic RLS by looking up the user’s role based on the user principal name of the viewer currently signed in.
Step-by-Step: Dynamic RLS
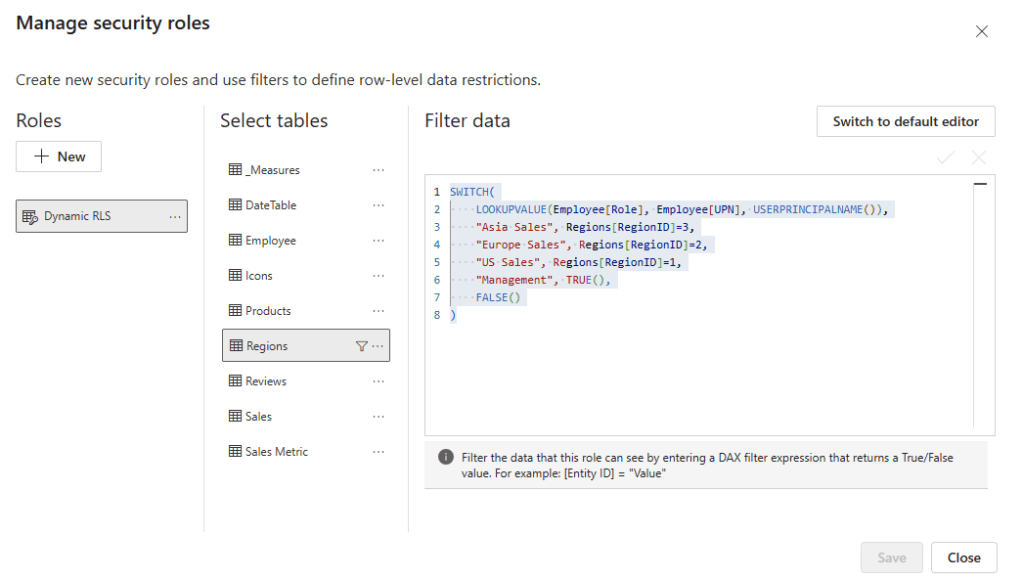
1. Set up a dynamic role using DAX Navigate to the Modeling tab and select Manage Roles. Then, in the Manage Security Roles dialog box, select + New under Roles.
We name the role, select the table to which the filter is applied, and, this time, rather than creating a static filter condition, select Switch to DAX editor to create our dynamic rule.
We filter the Region table based on the current user’s role using the following DAX expression:
The DAX expression looks up the user’s Role based on the current user’s user principal name (e.g. email).
2. Testing the dynamic filter After creating the rule, we must test and validate that it functions as expected. We navigate to the Modeling tab and select View as. Then, in the dialog box, we check the Other User option and enter a user’s email. We also check the dynamic filter rule we just created and select OK.
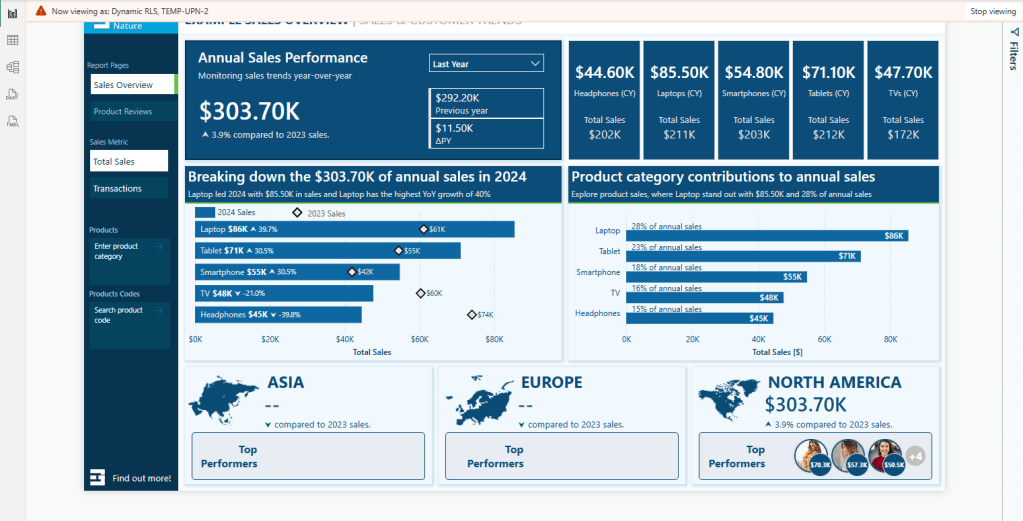
The report will refresh, and we will validate that the TEMP-UPN-2 user, who has the role of US Sales, sees data only for their assigned region.
3. Publish the report and add members to the role We publish the report to the Power BI Service. Then, to add members to the role in the Power BI Service, we must navigate to the workspace where we published the report. We locate the semantic model and select the More options ellipsis (…) and then Security.
Within the Row-Level Security screen, similar to what we did for static RLS, we can add users or security groups to each role we created.
Since we may implement dynamic row-level Security for better scalability, assigning a security group when adding members can be beneficial. Better yet, this security group can also give users their Viewer access to the report or app.
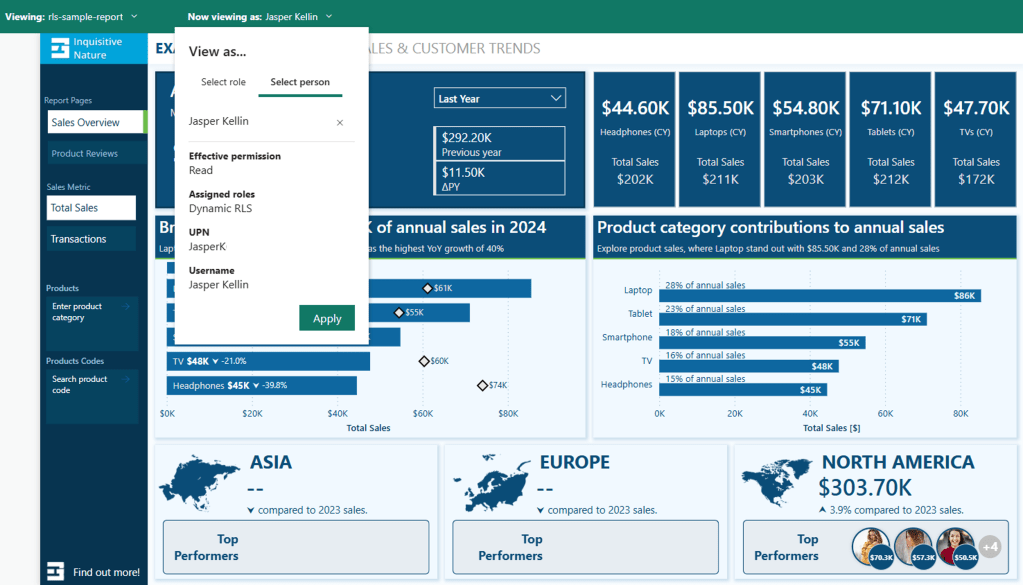
4. Validate roles in the Power BI Service On the Security screen, we select the More options ellipsis (…) next to each role and then Test as role.
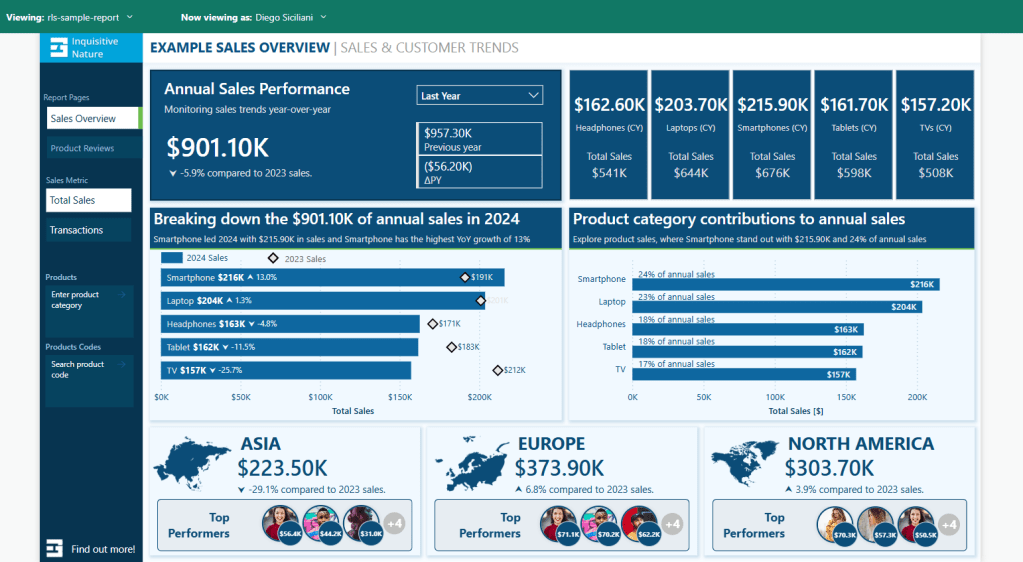
Then, at the top, we select Now viewing as and Select a person to validate that the RLS is functioning as expected. We will view the report as Jasper (TEMP-UPN-2) as we did in Power BI Desktop.
Note: The TEMP-UPN-# provided in the sample file will only function for testing in Power BI Desktop without requiring an actual email address. The UPN field must contain actual user email addresses to validate in the Power BI Service.
We can also validate the report for Diego (TEMP-UPN-4), who is assigned the Management role and should be able to see data for all sales regions
One last consideration is what happens when a user intentionally or unintentionally has access to view the report but does not have a Role defined in the Employee table.
If we review the DAX expression used for the filter:
The last value, or the default if no other condition is true, is set to FALSE(). This means that if a user is in the Employee table but either does not have a role or their role doesn’t match one defined in the rule, the report will be empty.
When testing the report, Grady (TEMP-UPN-5) is contained in the Employee table but does not have a role assigned.
Now that everything is working as expected, we have successfully implemented dynamic row-level Security. The benefit is that by using dynamic RLS, we replace four roles with a single rule applied dynamically based on the current user. Additionally, we can add an extra layer and hide data for users who have access to the report but are not assigned a role in the Employee table.
Considerations and Limitations
Before implementing RLS across our reports, it is important to consider and evaluate the impacts of RLS limitations.
Learn more about: Row-Level Security with Power BI
It’s also important to understand when Row-Level Security (RLS) is and is not the right tool.
We may consider publishing multiple semantic models if we have only a few simple RLS rules. For example, if we have just two sales regions, we might publish a separate semantic model for each region. Although the semantic models do not enforce RLS, we can use query parameters to filter the source data to the specific sales region. The use of query parameters would still allow us to publish the same model while displaying the relevant data for each region.
Advantages of not using Row-Level Security (RLS) include:
Improved Query Performance: With fewer filters applied to the data model, queries can run faster.
Smaller Models: While avoiding RLS may increase the number of models, each individual model is generally smaller, which can enhance query performance and data refresh responsiveness.
Full Access to Power BI Features: Certain features, like “Publish to the Web”, do not work with RLS.
However, there are also disadvantages to not implementing RLS:
Multiple Workspaces Required: Each user audience for reports may require its own workspace.
Content Duplication: Reports and dashboards must be created in each workspace, leading to redundancy and increased maintenance efforts.
Lack of Consolidated View: Users who belong to multiple report user audiences must open various reports, resulting in no single, consolidated view of their data.
Wrapping Up
Row-Level Security (RLS) is a valuable feature in Power BI that enables us to protect and customize report data according to the identity of the report viewer. With static RLS, we can implement straightforward, fixed access rules, while dynamic RLS offers a more scalable and flexible solution. RLS allows us to provide tailored insights that meet the specific needs of different users.
It’s important to remember that Row-Level Security only filters rows in a table and does not limit access to model objects like tables or columns. If your requirements involve hiding entire tables or specific columns within a table, you should consider using Power BI Object-Level Security (OLS).
RLS can sometimes be overly restrictive when it comes to broader calculations. For example, we could display the total sales for each region to all users or calculate the percentage of total sales across all regions. However, RLS rules filter these total sales values, leading to complications. This is where the concept of partial RLS comes into play, allowing us to secure specific data while still accessing global context for certain calculations.
Stay tuned and subscribe so you won’t miss upcoming posts in this series, focusing on the partial RLS design pattern and object-level security.
Thank you for reading! Stay curious, and until next time, happy learning.
And, remember, as Albert Einstein once said, “Anyone who has never made a mistake has never tried anything new.” So, don’t be afraid of making mistakes, practice makes perfect. Continuously experiment, explore, and challenge yourself with real-world scenarios.
If this sparked your curiosity, keep that spark alive and check back frequently. Better yet, be sure not to miss a post by subscribing! With each new post comes an opportunity to learn something new.
How to Update Locked SharePoint Files Without Loops or User Headaches
The Hidden Workflow Killer: Locked Files in SharePoint
Imagine you have created a Power Automate workflow for a document approval process that updates a status property of the document to keep end users informed. The workflow operates smoothly until you encounter failures, with an error message stating, “The file <file_path> is locked for shared use by <user_email>“.
This is a common issue encountered in workflows that update file metadata while users have the file open or during co-authoring. Without proper error handling, users may not even realize that the workflow has failed, which can lead to confusion and increased support requests to resolve the workflow problem.
A common solution to this problem involves checking whether the file is locked and repeatedly attempting to update it until the lock is released.
In this post, we will explore a more practical approach. Instead of waiting for the file lock to be released, we can detect the lock, extract the source control lock ID, and use it to update the file without any user intervention, even when the file is in use.
The Waiting Game: Why Do Until Loops Leave Everyone Hanging
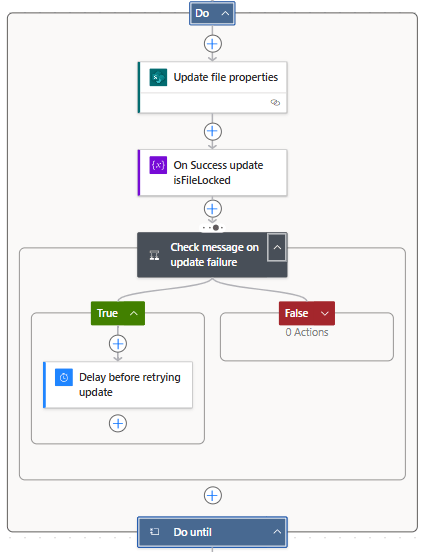
One workaround for a locked SharePoint file in Power Automate is to use a Do Until loop. The concept is straightforward: check if the file is locked, and if it is, use a delay action to wait before checking again. Repeat this process until the file becomes available. While it may not be the most elegant solution, it effectively gets the job done—at least sometimes.
Here is how this approach may look.
This process can be improved by identifying the user who has locked the file and sending them a notification to close it, allowing the workflow to continue. While this approach enhances the system, it still requires user intervention for the workflow to proceed.
In practice, this approach can be clunky. By default, it runs silently in the background and continues to loop without providing feedback to users. From their perspective, the workflow is broken. Users may attempt to retry the action, submit duplicate requests, or contact the workflow owner. When, in reality, the workflow is functioning as intended, it is simply waiting for the file to become available.
Even if notifications are sent to the user who has the file locked, the process still relies on that user to take action before it can proceed. If the user ignores the alert, is away or is out of the office, the process stalls. This type of automated update to file metadata should not depend on user action to function correctly.
The Upgrade: Skip the Wait and Update Locked Files Instantly
There is a more effective way to manage locked files without needing to retry failed updates or alert users to close their documents. Instead of waiting for SharePoint to release the lock, we can leverage some lesser-known features and properties of the files.
The key component of this approach is the LockedByUser file property. We can send an HTTP request to SharePoint using the lockedByUser endpoint to determine if the file is locked and by whom. More importantly, SharePoint also maintains a source control lock ID that can be used to override the lock in specific scenarios.
The process operates as follows: The workflow first checks if the file is locked by inspecting the lockedByUser response. If the file is locked, the workflow extracts the lock ID and then updates the file by passing the lock ID to SharePoint. If the file is not locked, it is updated as usual.
This method allows users to bypass waiting on the workflow. The file metadata is updated seamlessly, and the workflow moves to its subsequent actions.
Step-by-Step Guide to Implementing the New Approach
This method may seem technical, and while it is more complex than the Do until loop workaround, it is more straightforward than you might think.
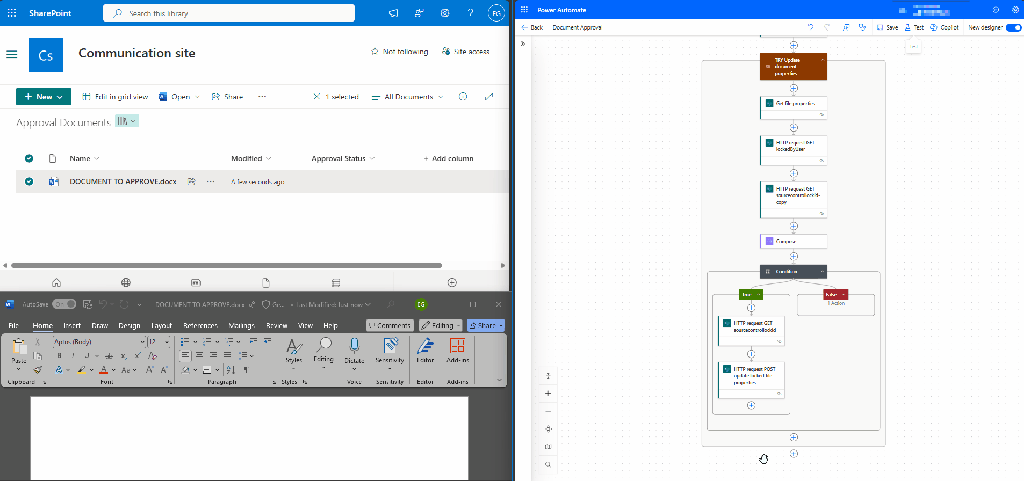
Here is the workflow overview.
Get the file properties
The workflow starts by using the Get file properties action to retrieve all the properties of the file that triggered the workflow. We set the Site Address and Library Name and use dynamic content to select the ID from the selected file trigger.
Get lockedByUser Property
To retrieve the lockedByUser property value, we use the Send an HTTP request to SharePoint action. In this action, we set the Site Address to our SharePoint site and set the Method to GET. For the Uri, we use:
Finding the <documentlibrary_guid> for this action can be challenging. However, since we already have the Get file properties action, we can use Power Automate’s Code view to locate the required value.
Then, we use dynamic content for the <documentlibrary_itemId> to add the required ID value. Lastly, under Advanced parameters, we set the headers as follows:
If odata.null is not equal to true, our file is locked, and the workflow progresses down the True branch. We first need to obtain the source control lock ID to update the locked file.
You might be wondering where to find the lock ID. To view a list of file properties available within our workflow—beyond the basic properties returned by the Get file properties action—we add another Send an HTTP request to SharePoint action.
First, set the Site Address to our SharePoint site and choose “GET” as the Method. Then, use the following URI:
_api/web/lists('<documentlibrary_guid>')/items('<documentlibrary_itemId>')/File/Properties

*See the Get lockedByUser Property section to located <documentlibrary_guid> and <documentlibrary_itemId>
We can proceed to run a test of our workflow to examine the raw output of this request. In the output, we will see a list of available properties. The specific property we need is the value of vti_x005f_sourcecontrollockid.
Next, we will update the URI to select this particular property value.
Once we have the required lock ID, we use another Send HTTP request to SharePoint action to perform the update. We set the Site Address to our SharePoint site and choose POST as the Method. Then, under the Advanced parameters, we select Show all to provide the necessary headers and body values.
If the file is not locked, we use the Send a HTTP request to SharePoint action to update the file. We configure the action the same way as the HTTP request used for the locked file, with the only difference being the body parameter.
Since the file is not locked, we do not include the sharedLockId property in the body parameter.
{
   "formValues": [
      {
         "FieldName": "ApprovalStatus",
         "FieldValue": "In Process (Updated Locked File)"
      }
   ],
   "bNewDocumentUpdate": true
}
Here is the workflow in action.
Continue the workflow with any Additional Actions
Once the update to the file metadata is complete, the workflow continues as usual. The file is updated directly, regardless of whether it is locked.
Although this approach requires some initial setup, once implemented, the workflow becomes more resilient and less dependent on unpredictable user behavior.
Wrapping Up
Locked SharePoint files can disrupt our Power Automate workflows, causing updates to stall and confusing users. Common fixes, such as using Do Until loops and notifications rely heavily on timing and user intervention.
The approach outlined here first checks if the file is locked. If it is, the method extracts the lock ID and sends an HTTP request to update the file with no retries or end-user intervention.
This workflow makes our workflow more efficient and reliable, enabling true automation without requiring any user action for the workflow to proceed.
Curious about the TRY Update document properties scope within the workflow?
Check out this post focused on Power Automate error handling and notifications.
Learn how to create a dynamic failure notification framework across Teams channels with a centralized SharePoint setup.
Thank you for reading! Stay curious, and until next time, happy learning.
And, remember, as Albert Einstein once said, “Anyone who has never made a mistake has never tried anything new.” So, don’t be afraid of making mistakes, practice makes perfect. Continuously experiment, explore, and challenge yourself with real-world scenarios.
If this sparked your curiosity, keep that spark alive and check back frequently. Better yet, be sure not to miss a post by subscribing! With each new post comes an opportunity to learn something new.
Stay ahead of the latest features with a focused look at Power BI’s latest features, their benefits, and use cases. Dive into walkthroughs and tips to enhance your reports.
The Power BI November 2024 update introduced several exciting enhancements and preview features.
I was particularly interested in the new text slicer preview feature and the quick query option for defining measures in DAX query view. Both of these improvements have the potential to enhance data filtering flexibility, simplify workflows, and increase overall efficiency.
The New Text Slicer: Customized Filtering for Power BI
The new text slicer visual preview feature, introduced in the November 2024 Power BI update, is a versatile tool designed to enhance interactivity and filtering based on text input. This feature allows users to enter specific text, making it easier to explore data and quickly find relevant information.
Benefits of the Text Slicer: Improved Usability and Customization
The text slicer offers a user-friendly and adaptable filtering option with straightforward functionality. Its advantages are particularly evident when filtering datasets that contain high-cardinality fields, such as customer names, product IDs, or order numbers.
Additionally, the slicer features customization options that allow us to adjust its design to fit our report. We can set placeholder text to guide users on what input is expected, and its properties enable us to customize the font and color of various elements, ensuring both readability and visual appeal.
After updating to the latest version of Power BI Desktop, you can enable the new feature by navigating to Options and Settings > Options > Preview features and then checking the box next to the Text Slicer visual.
Once enabled, you will find the new slicer in the Build menu, allowing you to add the visual to your report canvas.
After adding the visual to the report canvas, drag the text field from the data model that you want the slicer to filter on into the slicer’s Field property. Then, type your desired text into the slicer’s input box and click the apply icon to filter the results instantly.
Use Cases: Applying the Text Slicer in Reports
Filtering by Product Category– Exploring the basics
My sample dataset includes product sales, with each product assigned to a specific category. We can use the text slicer to filter the data by product category, such as “Laptop.”
After entering and applying the desired input, the text slicer quickly filters the report page to display only the specified product category. Once the filter is applied, clicking the dismiss (“X”) button will remove it and return to the full dataset.
Filtering our dataset using the text filter alongside the product category yields the same results as using the standard slicer. However, unlike the standard slicer, which displays all categories, the text slicer allows users to type and filter to the desired category directly.
This feature is handy when there are numerous categories to choose from, as scrolling through the list can be time-consuming. Additionally, the text slicer does not require users to toggle on a search functionality like the standard dropdown-styled slicer. With the text slicer, users can enter the category, apply the filter, and quickly narrow the report to the relevant sales data.
This application serves as a good introduction to the functionality of the text slicer and provides a useful comparison with the standard slicer.
Filter on Parts of a Product Code – Explore data without a standalone field
The Products table in the dataset contains product codes that have embedded information, such as the product’s color code. The text slicer offers a quick and effective solution for filtering on this embedded information.
For instance, a product code like SM-5933-BK includes the color code “BK,” which signifies the color black. Using a text slicer on the product code field with the input “BK,” we can filter all products linked to the color black without needing a separate product color filtering dimension in the data model.
The text slicer in this scenario helps us better utilize the data in our dataset to analyze sales data.
Removing the need to extract the color code and add extra filtering dimensions to the data model can be beneficial, especially in cases where changes to the data model are not allowed.
Search and Filter Product Review – Analyze long-form text fields
The sample dataset includes a table of product reviews. The text slicer allows us to filter by keywords, enabling exploration and analysis of specific feedback. For instance, entering the keyword “battery” filters the report page to only the reviews that mention battery across all products.
This allows decision-makers to concentrate on relevant reviews, recognize trends, and extract insights regarding common issues or exceptional features.
Since the text slicer is currently a preview feature, I am not prepared to incorporate it into any production reports just yet. However, I find the potential it offers for our reports intriguing. A current limitation of the text slicer is it only allows us to input a single text input, limiting our ability to search a variety of related terms. I look forward to seeing how it develops with the introduction of new properties and functionalities.
DAX Query View Quick Queries: Define new measure
With the November 2024 update, the DAX query view quick queries options were updated and now include a define new measure option. Quick queries boost productivity for common tasks and can be further modified. Adding the ability to define a new measure to the quick queries options will aid in streamlining workflows in Power BI.
This option, available through the context menu of tables and columns, generates a query-scoped DAX measure formula framework, allowing us to modify and execute custom measures with minimal setup.
For instance, the Review Count visual utilizes the implicit count of Review IDs to show the number of reviews for each product category. We can quickly and easily use the Define a new measure option to create our DAX formula syntax to get started creating an explicit summary measure to add to this visual. After customizing the formula for our specific measure, we can view the results and update the data model accordingly.
This simple and clear example demonstrates how quick queries can assist us in starting common tasks. We can easily expand on this foundation to develop more complex calculations and measures to enhance our data model.
To learn more about working with DAX query view, check out the Work with DAX query view documentation.
Wrapping Up
The new text slicer preview feature in the November 2024 Power BI update is an exciting addition. It will be interesting to see how this feature develops over time. Once fully implemented, its ability to provide quick and intuitive filtering will enhance user interactivity, making it a valuable tool for dynamic and user-friendly reporting.
The new “Define a new measure” quick query option in DAX query view is a helpful addition. This feature allows us to quickly create new measures by providing a starting point for the syntax needed to create a query-scoped measure DAX formula.
Power BI updates continually transform how we explore and analyze data, enabling us to create more compelling and interactive reports. By experimenting with the text slicer and other new features, we can gain a better understanding of how to fully utilize them in our reports.
Thank you for reading! Stay curious, and until next time, happy learning.
And, remember, as Albert Einstein once said, “Anyone who has never made a mistake has never tried anything new.” So, don’t be afraid of making mistakes, practice makes perfect. Continuously experiment, explore, and challenge yourself with real-world scenarios.
If this sparked your curiosity, keep that spark alive and check back frequently. Better yet, be sure not to miss a post by subscribing! With each new post comes an opportunity to learn something new.
Learn how to create a dynamic failure notification framework across Teams channels with a centralized SharePoint setup
Handling errors in Power Automate workflows can be challenging, especially when managing notifications across multiple flows. Adding contact details to each flow can become inefficient and difficult to maintain.
The Microsoft ecosystem offers various options and integrations to address these inefficiencies. In this approach, we will use a SharePoint list to centralize contact information, such as Teams Channel IDs and Teams Tag IDs. This method simplifies management and enhances our failure notification framework.
We will explore two methods. The first involves using Teams shared channels with @mentioning Teams tags to notify a specific group of users within our Power Automate Failure Notifications Teams team. The second method utilizes direct user @mentions in private Teams channels. Both methods employ a solution-aware flow, providing a reusable failure notification framework.
Power Automate Error Handling Best Practices
Before we can send failure notifications using our reusable framework, we first need to identify and handle errors within our workflows. It is essential to incorporate error handling into all our business-critical workflows to ensure that our Power Automate flows are resilient and reliable.
The configure run after setting is crucial for identifying the outcomes of actions within a workflow. It lets us know which actions were successful, failed, skipped, or timed out. By utilizing this feature, we can control how subsequent actions will behave based on the result of prior actions. Customizing these settings allows us to develop flexible and robust error-handling strategies.
Beyond using configure run after, there are important patterns that support effective error management in Power Automate:
Scoped Control (Try-Catch blocks): Grouping actions within the Scope control object aids in managing the outcomes of that set of actions. This method is valuable for isolating distinct parts of our workflow and handling errors effectively.
Parallel Branching: Establishing parallel branches enables certain workflow actions to continue even if others encounter errors. This approach allows us to run error-handling notifications or fallback actions concurrently with the primary process, enhancing the resilience of our flow and preventing interruptions.
Do Until Loop: For situations where actions may need multiple attempts to succeed, the Do Until control object permits us to execute actions until a specified success condition is met or a failure condition triggers our error-handling process.
These patterns collectively improve the reliability of our workflows by incorporating structured and consistent error handling. Identifying errors is just the first step; we must also notify the relevant individuals when a workflow encounters an issue so they can determine if further action or bug fixes are necessary.
Managing error notifications across multiple workflows can be difficult when contact information, such as an email address, is hardcoded into each individual flow. To address this, we will explore centralizing error notification details using a SharePoint list. This approach allows us to separate contact management from the flow logic and definitions.
The Final Solution in Action
Using Teams and Shared Channels with @mentioning Teams tags offers a practical and flexible solution. Teams tags enable us to group team members by their responsibilities, such as Development Team or workflow-specific groups. Using Teams tags makes it easy to alert an entire group using a single @mention tag.
In this example, we implement the Scoped Control (Try-Catch blocks) error handling pattern. This pattern groups a related set of actions into a scope, so if any action fails, we can handle the errors using an associated catch scope.
Here’s a basic flow that is triggered manually and attempts to list the members of a Teams Group chat.
When a non-existent Group chat ID is provided, the List members action will fail. This failure triggers the CATCH scope to execute. The CATCH scope is configured to run only when the TRY scope fails or times out.
When the CATCH scope executes, the flow filters the result of the TRY scope to identify which action failed or timed out using the following expressions:
Next, the flow utilizes the reusable notification framework to send a notification to Teams identifying that an error has occurred and providing details of the error message. We use the Run a Child Flow action and select our reusable error notification workflow for this purpose. This workflow requires three inputs:
When this workflow is triggered, and the TRY scope fails, we receive a Teams notification dynamically sent to the appropriate channel within our Power Automate Failure Notification Team, alerting the necessary individuals using the Dev Team Teams tag and direct @mentioning the technical contact.
The advantage of this approach and framework is that the notification solution only needs to be built once, allowing it to be reused by any of our solution-aware and business-critical workflows that require error notifications.
Additionally, we can manage the individuals alerted by managing the members assigned to each Teams tag or by updating the technical and functional contact details within our SharePoint list. All these updates can be made without altering the underlying workflow.
Continue reading for more details on how to set up and build this error notification framework. This post will cover how the Power Automate Failure Notifications Teams team was set up, provide resources on Teams tags, demonstrate how to create and populate a centralized SharePoint list for the required notification details, and finally, outline the construction of the failure notification workflow.
Setting Up Teams
Our error notification solution utilizes a private Microsoft Team, which can consist of both shared and private channels.
Shared channels are a convenient and flexible option for workflows that are not sensitive in nature. By using shared channels, we can take advantage of the List all tags Teams action to notify a group with a single @mention in our error notifications.
For additional information on managing and using Teams tags, see the resources below:
Private channels should be used when the workflow involves more sensitive information or when error notifications need to be restricted to a specific subset of team members. In this case, the error notifications target specific individuals by using direct user @mentions.
Centralized Error Notifications Details with SharePoint
To improve the maintainability of our error notifications, we will centralize the storage of key information using a SharePoint list. This approach enables us to store essential details, such as functional and technical contacts, Teams channel IDs, Teams Tag IDs, workflow IDs, and workflow names in one location, making it easy to reference this information in our error notification workflow.
The SharePoint list will serve as a single source for all required flow-related details for our notification system. Each entry in the list corresponds to a specific flow. This centralized repository minimizes the need for hardcoded values. When teams or contact details change, we can simply update the SharePoint list without the need to modify each individual flow.
Steps to Create the SharePoint List
Create a New List: In SharePoint, create a new list with a descriptive name and an appropriate description.
Add Required Columns: Include all necessary required and optional columns to the new SharePoint list.
FlowDisplayName: identifies the specific flow that utilizes the error notification system we are creating.
FlowId: unique identifier for the workflow associated with the error notification system.
Technical Contact: the primary person responsible for technical oversight who will be notified of any errors.
Functional Contact: secondary contact, usually involved in business processes or operational roles.
TeamsChannelName: name of the Teams Channel where error notifications will be sent.
TeamsChannelId: unique identifier for the Teams Channel that the flow uses to direct notifications.
TeamsTagId: this field is relevant only for shared channel notifications and contains the ID of the Teams Tag used to notify specific groups or individuals.
Populate the List with Flow Details
Our failure notification system will send alerts using the Post message in a chat or channel action. When we add this action to our flow, we can use the drop-down menus to manually select which channel within our Power Automate Failure Notifications team should receive the message.
However, it’s important to note that the Channel selection displays the channel name for convenience. Using the peak code option, we can see that the action utilizes the Channel ID.
The same applies when using the Get a @mention token for a tag. To dynamically retrieve the token, we need the Tag ID, not just the Tag name.
These key pieces of information are essential for our Failure Notification solution to dynamically post messages to different channels or @mention different tags within our Failure Notification team.
While there are various methods, such as peek code, to manually find the required values, this can become inefficient as the number of flows increases. We can streamline this process by creating a SharePoint Setup workflow within our Failure Notification solution.
This workflow is designed to populate the SharePoint list with the details necessary for the dynamic error notification framework. By automatically retrieving the relevant Teams channel information and Teams tag IDs, it ensures that all the required data is captured and stored in the SharePoint list for use in error notification flows.
SharePoint Set Up Workflow
This workflow has a manual trigger and allows us to run the setup as needed by calling it using the Run a Child Flow action when we want to add our error notifications to a workflow.
The inputs consist of 6 required string inputs and 1 optional string input.
channelDisplayName (required): the channel display name that appears in Teams. workflowId (required): the flow ID to which we add our error notifications. We can use the expression: workflow()?['name']. workflowDisplayName(required): the display name of the flow to which we are adding our error notifications. We can manually type in the name or use the expression: workflow()?['flowDisplayName']. technicalContact(required): the email for the technical contact. functionalContact (required): the email for the functional contact. workflowEnvironment (required): the environment the flow we are adding the error handling notifications to is running in. We can use the expression: workflow()?['tags']?['environmentName'] tagName (optional): the display name of the Teams tag, which is manually entered. This input is optional because the error notification solution can be used for Shared or Private Teams channels. However, @mentioning a Teams tag is only utilized for Shared channels.
Following the trigger, we initialize two string variables. The first ChannelId and the second TagId.
Get the Teams Channel ID
The next set of actions lists all the channels for a specified Team and uses the channelDisplayName input to extract the ID for the channel and set the ChannelId variable.
The Teams List channels action retrieves a list of all available channels in our Power Automate Failure Notifications Teams team. The Filter array action then filters this list based on the channelDisplayName input parameter.
The flow then attempts to set the ChannelId variable using the expression: outputs('Filter_array_to_input_teams_channel')['body'][0]?['id'].
However, if the output body of the Filter array action is empty, setting the variable will fail. To address this, we add an action to handle this failure and set the ChannelId to “NOT FOUND”. This indicates that no channel within our Power Automate Failure Notifications team matches the provided input value.
To achieve this, we use the Configure run after setting mentioned earlier in the post and set this action to execute only when the TRY Set ChannelId action fails.
Get the Teams Tag ID
After extracting the Teams Channel ID, the flow has a series of similar actions to extract the Tag ID.
Create an item on the SharePoint List
Lastly, the flow creates a new item on our supporting SharePoint list using the flow-specific inputs to store all the required information for our error notification solution.
Reusable Error Notification Flow Architecture
As the number of our workflows increases, a common challenge is developing a consistent and scalable error notification system. Instead of creating a new notification process for each workflow, we can leverage reusable solution-aware flows across multiple workflows within our environment. This approach minimizes duplication and streamlines our error notification processes.
Flow Structure for Reusable Notifications
The reusable notification flow is triggered when an error occurs in another workflow using the Run a Child Flow action and providing the required inputs.
The notification workflow parses the details of the workflow that encounters an error, creates an HTML table containing the details of the error that occurred, and then sends the notification using the centralized SharePoint list created in the previous section and dynamically alerts the appropriate individuals.
Trigger Inputs & Data Operations
We can catch and notify responsible parties that an error occurred in a workflow by calling this notification flow, using the Run a Child Flow action, and providing the workflowDetails, errorMessage, and scropeName.
After the trigger, we carry out two data operations. First, we parse the workflowDetails using the Parse JSON action and the expression json(triggerBody()?['text']) for the Content. Then, we create an HTML table using the information provided by our errorMessage input.
For the Create HTML table action, we use the following expressions for the inputs:
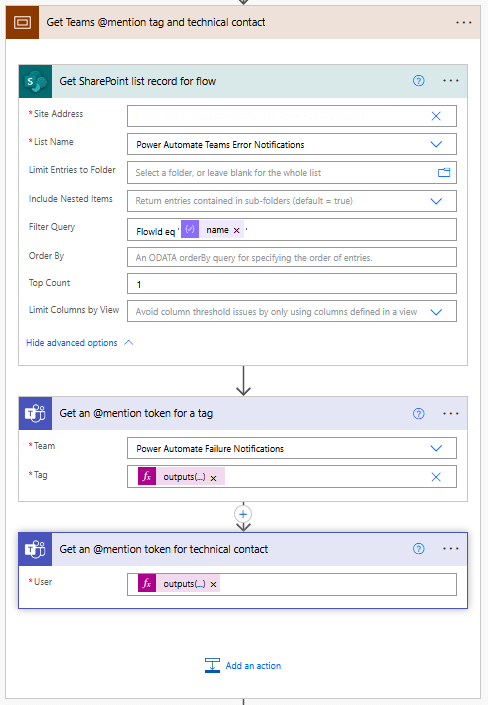
The notification flow queries the centralized SharePoint list to retrieve the necessary contact details and Teams information associated with the workflow that encountered the error.
We begin this subprocess by using the SharePoint Get items action with the Filter Query: FlowId eq 'body('Parse_workflowDetails_JSON')?['name']'.
Since each FlowID on our list should have only 1 record, we set the Top Count to 1.
Then, if our Power Automate Failure Notification Teams team uses Shared Channels, we use the Teams Get an @mention token for a tag and pass it the TagId stored within our SharePoint list using: outputs('Get_SharePoint_list_record_for_flow')?['body/value'][0]?['TagId'].
If the notification team uses private channels, this action can be excluded.
Lastly, for both Shared and Private channel notifications, we use the Teams Get an @mention token for user action to get the token for the technical contact stored within our SharePoint list using: outputs('Get_SharePoint_list_record_for_flow')?['body/value'][0]?['TechnicalContact']?['Email']
Send Teams Notification
Once we have retrieved the required contact details from SharePoint and Teams, the flow sends a notification to the appropriate Teams channel, notifying the relevant individuals. For Shared Channels, the message uses the @mention token for a Teams tag. If Private Channels are utilized, this should be removed from the flow and message.
Additionally, the message can be posted as the Flow bot when using Shared channels. However, when using Private channels, the message must be posted as User.
The flow dynamically sets the Channel using the ChannelId stored within our SharePoint list with the expression: outputs('Get_SharePoint_list_record_for_flow')?['body/value'][0]?['ChannelId'].
The message begins by identifying the workflow in which an error was encountered and the environment in which it is running.
Error reported in workflow: body('Parse_workflowDetails_JSON')?['tags']?['flowDisplayName'] {body('Parse_workflowDetails_JSON')?['tags']?['environmentName']}
Then, the message adds the HTML table created with the error message details using the following expression: body('Create_HTML_table_with_error_action_and_message').
Finally, it notifies the contacts for the workflow by using the @mention tokens for the Teams tag and/or the technical contact. The message also provides the details on the functional contact using the expression: outputs('Get_SharePoint_list_record_for_flow')?['body/value'][0]?['FunctionalContact']?['Email']
The notification process sends an informative and targeted message, ensuring all the appropriate individuals are alerted that an error has occurred within a workflow.
Reusability
This architecture enables us to develop a single workflow that can trigger error notifications for any new workflows, making our error handling and notification process scalable and more efficient.
By using this approach, we can avoid hardcoding notification logic and contact details in each of our workflows. Instead, we can centrally manage all error notifications. This reduces the time and effort needed to maintain consistent error notifications across multiple workflows.
Wrapping Up
This Power Automate error notification framework provides a scalable solution for managing notifications by centralizing contact information in a SharePoint list and leveraging solution-aware flows. Setting up a single, reusable notification flow eliminates the need to hardcode contact details within each workflow, making maintenance and updates more efficient.
The framework targeted two notification methods: Shared Teams channels with tags and Private Teams channels with direct mentions. This system ensures error notifications are delivered to the right individuals based on context and need.
Shared Channels with Teams Tags
This approach sends notifications to a shared Teams channel, with Teams tags allowing us to notify a group of individuals (such as a “Dev Team”) using a single @mention.
How It Works: The notification flow retrieves tag and channel details from the SharePoint list. It then posts the error notification to the shared channel, @mentioning the relevant Teams tag to ensure all tag members are alerted.
Advantages: This method is scalable and easy to manage. Team members can be added or removed from tags within Teams, so updates don’t require changes to the flow definition. This is ideal for notifying larger groups or managing frequent role changes.
Private Channels with Direct @Mentions
Private channels are used to send notifications directly alerting a technical contact when workflow and error details should not be visible to the entire Team.
How It Works: The flow dynamically retrieves contact details from the SharePoint list and posts the error notification to the private channel, mentioning the designated technical contact.
Advantages: This approach provides greater control over the visibility of the notifications, as access is restricted to only those users included in the private channel.
Each of these approaches is flexible and reusable across multiple workflows, simplifying the process of managing error notifications while ensuring messages reach the appropriate individuals based on the notification requirements.
Thank you for reading! Stay curious, and until next time, happy learning.
And, remember, as Albert Einstein once said, “Anyone who has never made a mistake has never tried anything new.” So, don’t be afraid of making mistakes, practice makes perfect. Continuously experiment, explore, and challenge yourself with real-world scenarios.
If this sparked your curiosity, keep that spark alive and check back frequently. Better yet, be sure not to miss a post by subscribing! With each new post comes an opportunity to learn something new.